Preferences
The Preferences Window is used for various general configuration operations (such as audio parameters, OSC settings, shutting down or restart the processor, etc.).
With HOLOPHONIX 2.0, advanced tasks such as network configuration or system updates can also be performed directly from the web remote interface.
Audio Tab
- Processor
- Native
From this tab you can set or read all the Audio Preferences of your Preset.
The DSP/CPU usage indicator along with the audio dropout counter are here to help you optimize your Preset's performances.
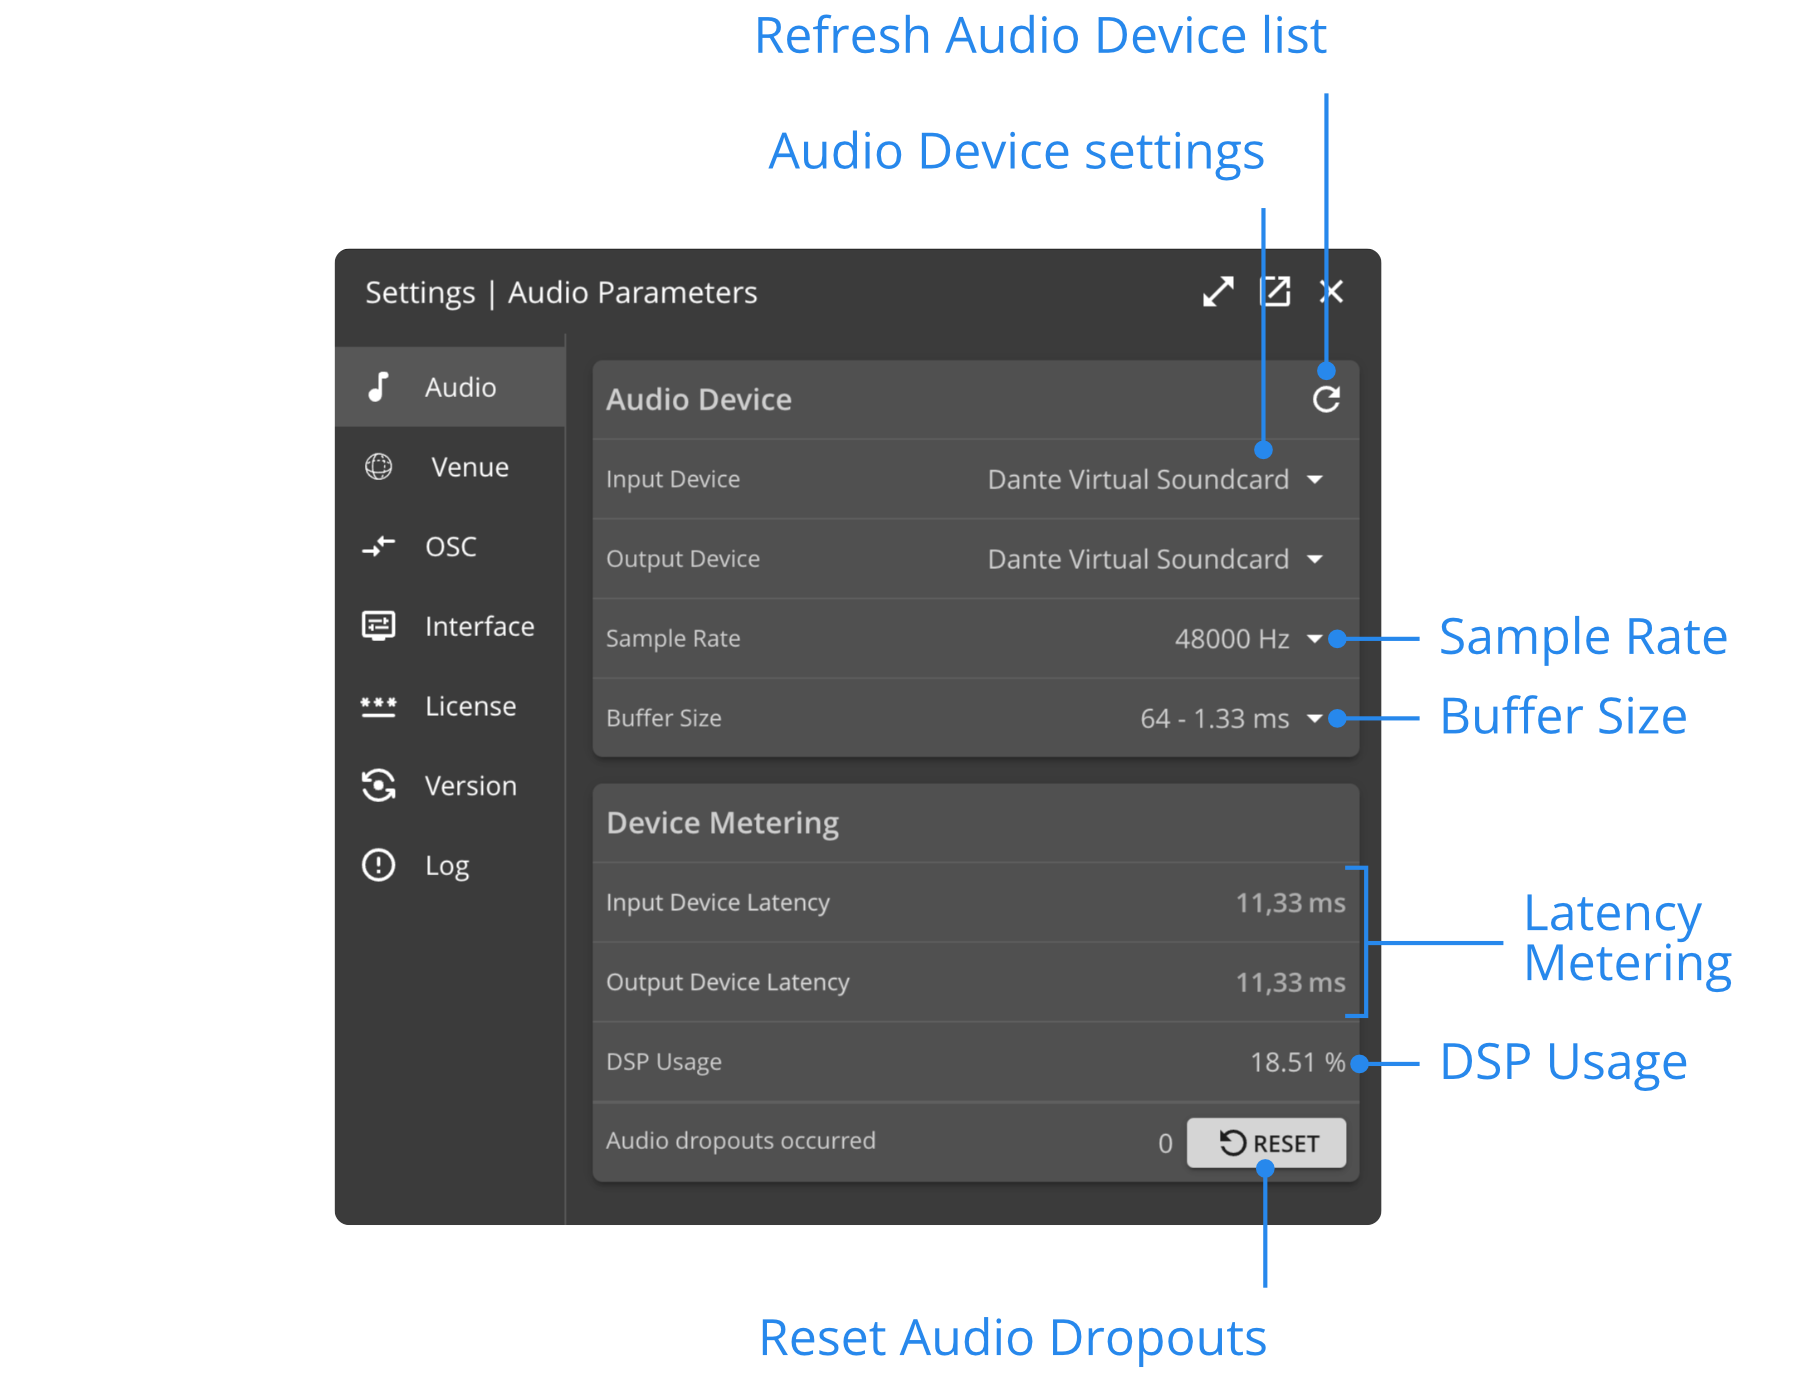
Buffer Size
HOLOPHONIX was designed to allow a low latency, while still offering high CPU power. Therefore, you can use very low buffer sizes with your HOLOPHONIX processor. However, for sessions with high DSP usage, it may be necessary to raise the buffer size to prevent any audio dropouts or distortions.
To avoid a global latency that would be too high, check the latency of every piece of equipment in your audio system.
Venue
General
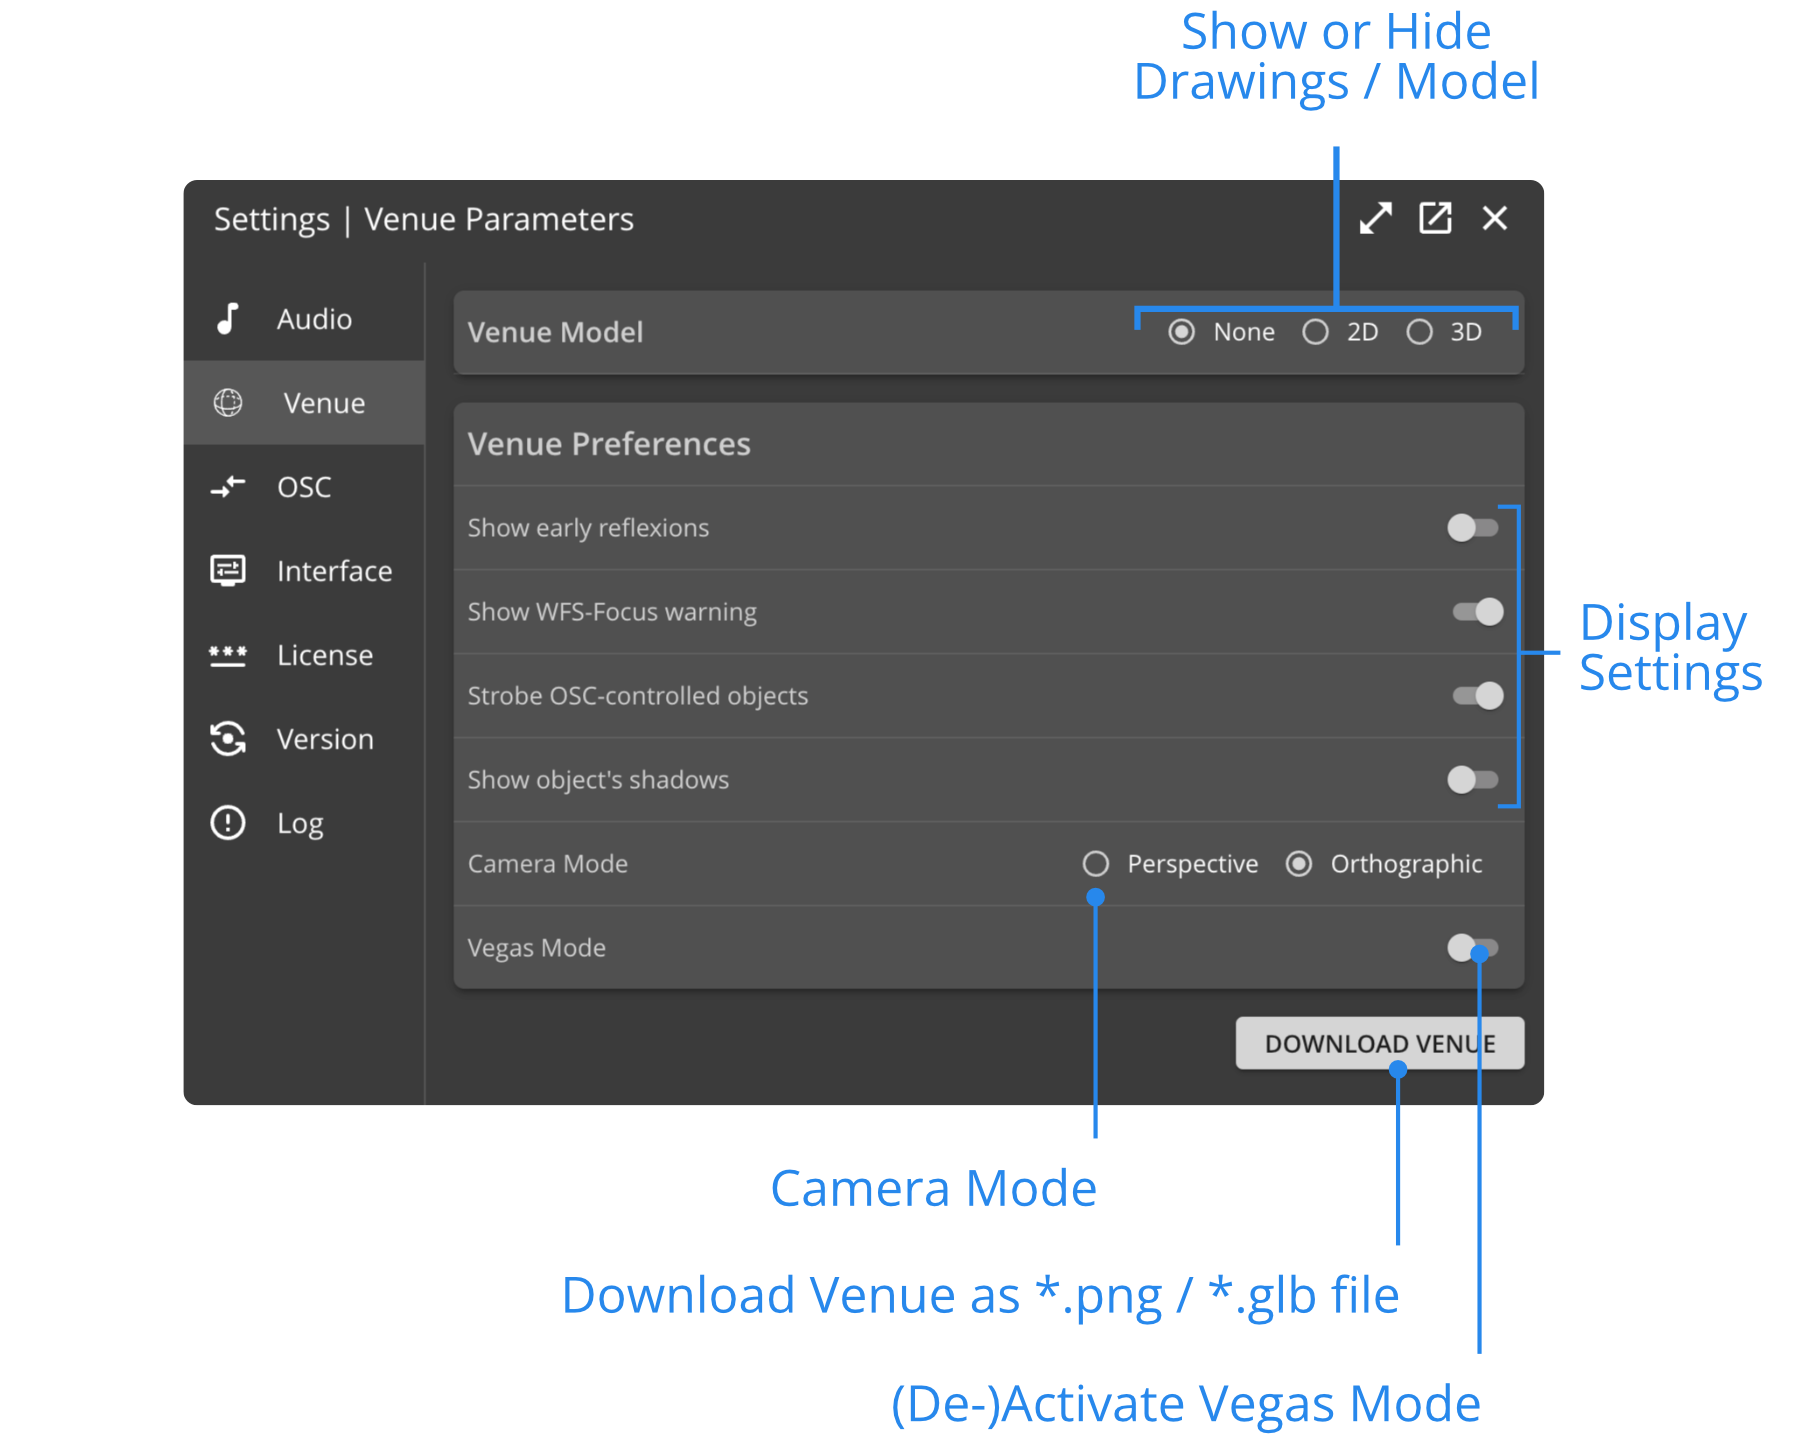
Show early reflections
Display the virtual positions of the early reflections.
Show WFS-Focus warning
Activate this setting to be warned when a Source is moved in front of a loudspeaker array assigned to a WFS bus. To learn more about it, check the WFS Requirements specifications in the documentation.
Strobe OSC-controlled objects
When Sources are controlled externally through OSC, they appear as blinking elements to easily identify which elements are being controlled through HOLOSCORE for example. Activating this setting turns the blinking off.
Show object's shadows
You can hide the object's shadows in the Venue to save on CPU power. However, hiding the shadows makes it harder to evaluate where your objects are placed, and how you move them.
Camera Mode
You can choose the technique of 3D rendering. The Perspective mode might seem more natural, whereas the Orthographic display is probably easier to work with, displaying all the distances at the same size. To learn more, check the Camera Mode in the Option Bar section of the documentation.
Vegas Mode
Activate this setting to enter a visualization mode that automatically spins around the origin of the Venue. Vegas Mode is meant for demonstration purposes and should not be used to work on your project.
3D Models
You can import a 3D model of your Venue (as a .GLB file). To do so, select 3D in the "Venue Model" setting.
To learn how to convert a file to .GLB and import it to HOLOPHONIX, check our YouTube tutorial here.

3D Model
Click on the Import button to load the 3D model corresponding to your Venue. Please note that models (and drawings) are saved in Projects, meaning all of the Presets in your Project will use the same model.
Display Mode
- A Solid model renders all surfaces, their edges, and thickness. It will therefore be a more or less perfect replica of your Venue, depending on how accurate your 3D model is. This Display Mode is more CPU-intensive.
- A Wireframe model is a skeletal description of a 3D object. It consists only of points, lines, and curves that describe the edges of your Venue. Choosing this option is therefore more CPU-efficient as it does not render surfaces.
Scale, Position Offset, and Rotation
Use the Scale, Position Offset and Rotation settings to adjust the 3D model's positioning in the Venue.
Opacity
This setting defines the transparency of the 3D model. The lower the opacity, the more visible the background is. Opacity does not have any significant impact on CPU usage.
2D Drawings
You can import a 2D map of your Venue (as a .PNG file). To do so, select 2D in the "Venue Model" setting.
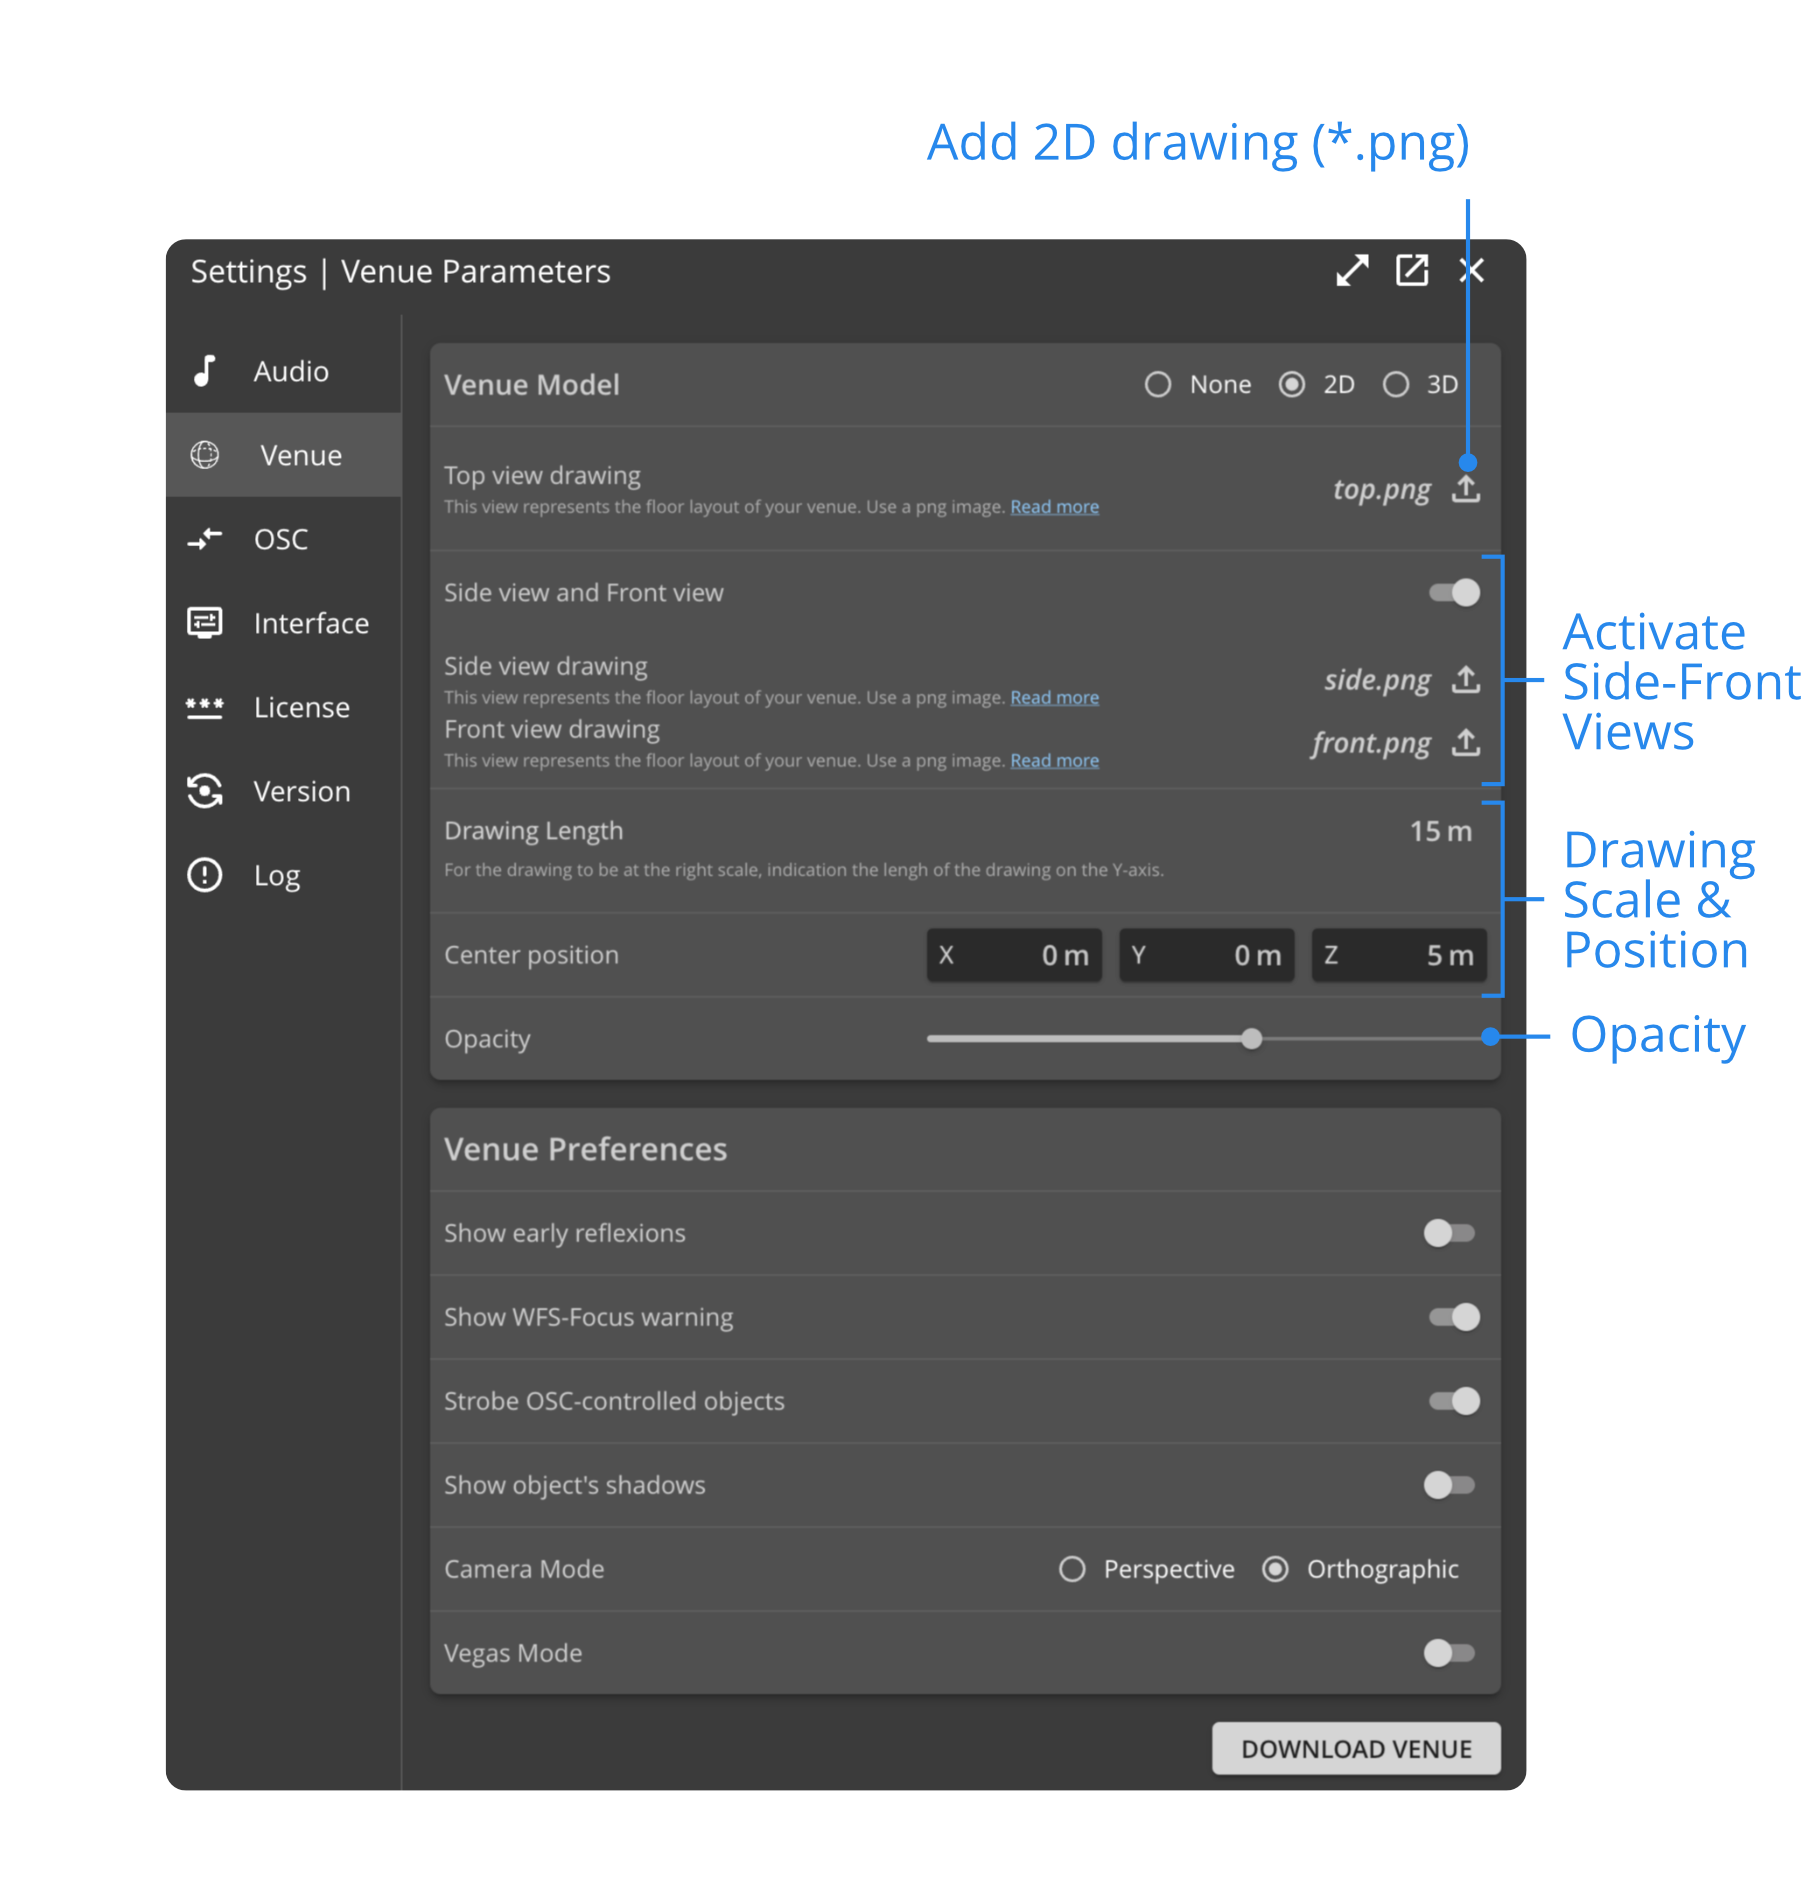
Top View Drawing
Click on the Import button to load the 2D drawing corresponding to the Top View of your Venue. Please note that drawings (and models) are saved in Projects, meaning all of the Presets in your Project will use the same drawings.
Side View and Front View
You can choose to add drawings corresponding to the Side and Front views of your Venue. This can be helpful to position objects more precisely regarding elevation. Click on the button to activate the display of those views, and add them with the Import button.
Drawing Length and Center Position
Use the Drawing length setting along with the X, Y, Z Offsets of the Center Positionto adjust the map's positioning in the Venue.
In Advanced Mode, you can also import Side and Front drawings. Activate "Show Side and Front Drawings" to display them in the Venue.
Opacity
This setting defines the transparency of the 2D map. The lower the opacity, the more visible the background is. Opacity does not have any significant impact on CPU usage.
OSC Tab

OSC Output
To send OSC messages from HOLOPHONIX to an external device, add an OSC output with the Add button, fill in the destination IP address and port number, then activate the output by clicking on the On button.
Use the Coordinate column to choose if the sources' positioning will be outputted in XYZ or AED formats.
The OSC Output Filter allows you to filter out of the OSC output messages containing specific key words or string of characters.
OSC Input
Input Port
Customize the port on which you can receive Open Sound Control messages.
If you are using HOLOPHONIX Native or HOLOPHONIX Designer, make sure each OSC App on your computer is using a different Input port. Two applications can't share the same input port on the same computer.
ADM-OSC Scale
When receiving normalized ADM-OSC positioning messages, use this scaling setting to adjust all the received positions, without having to change the OSC automation.
Interface Tab
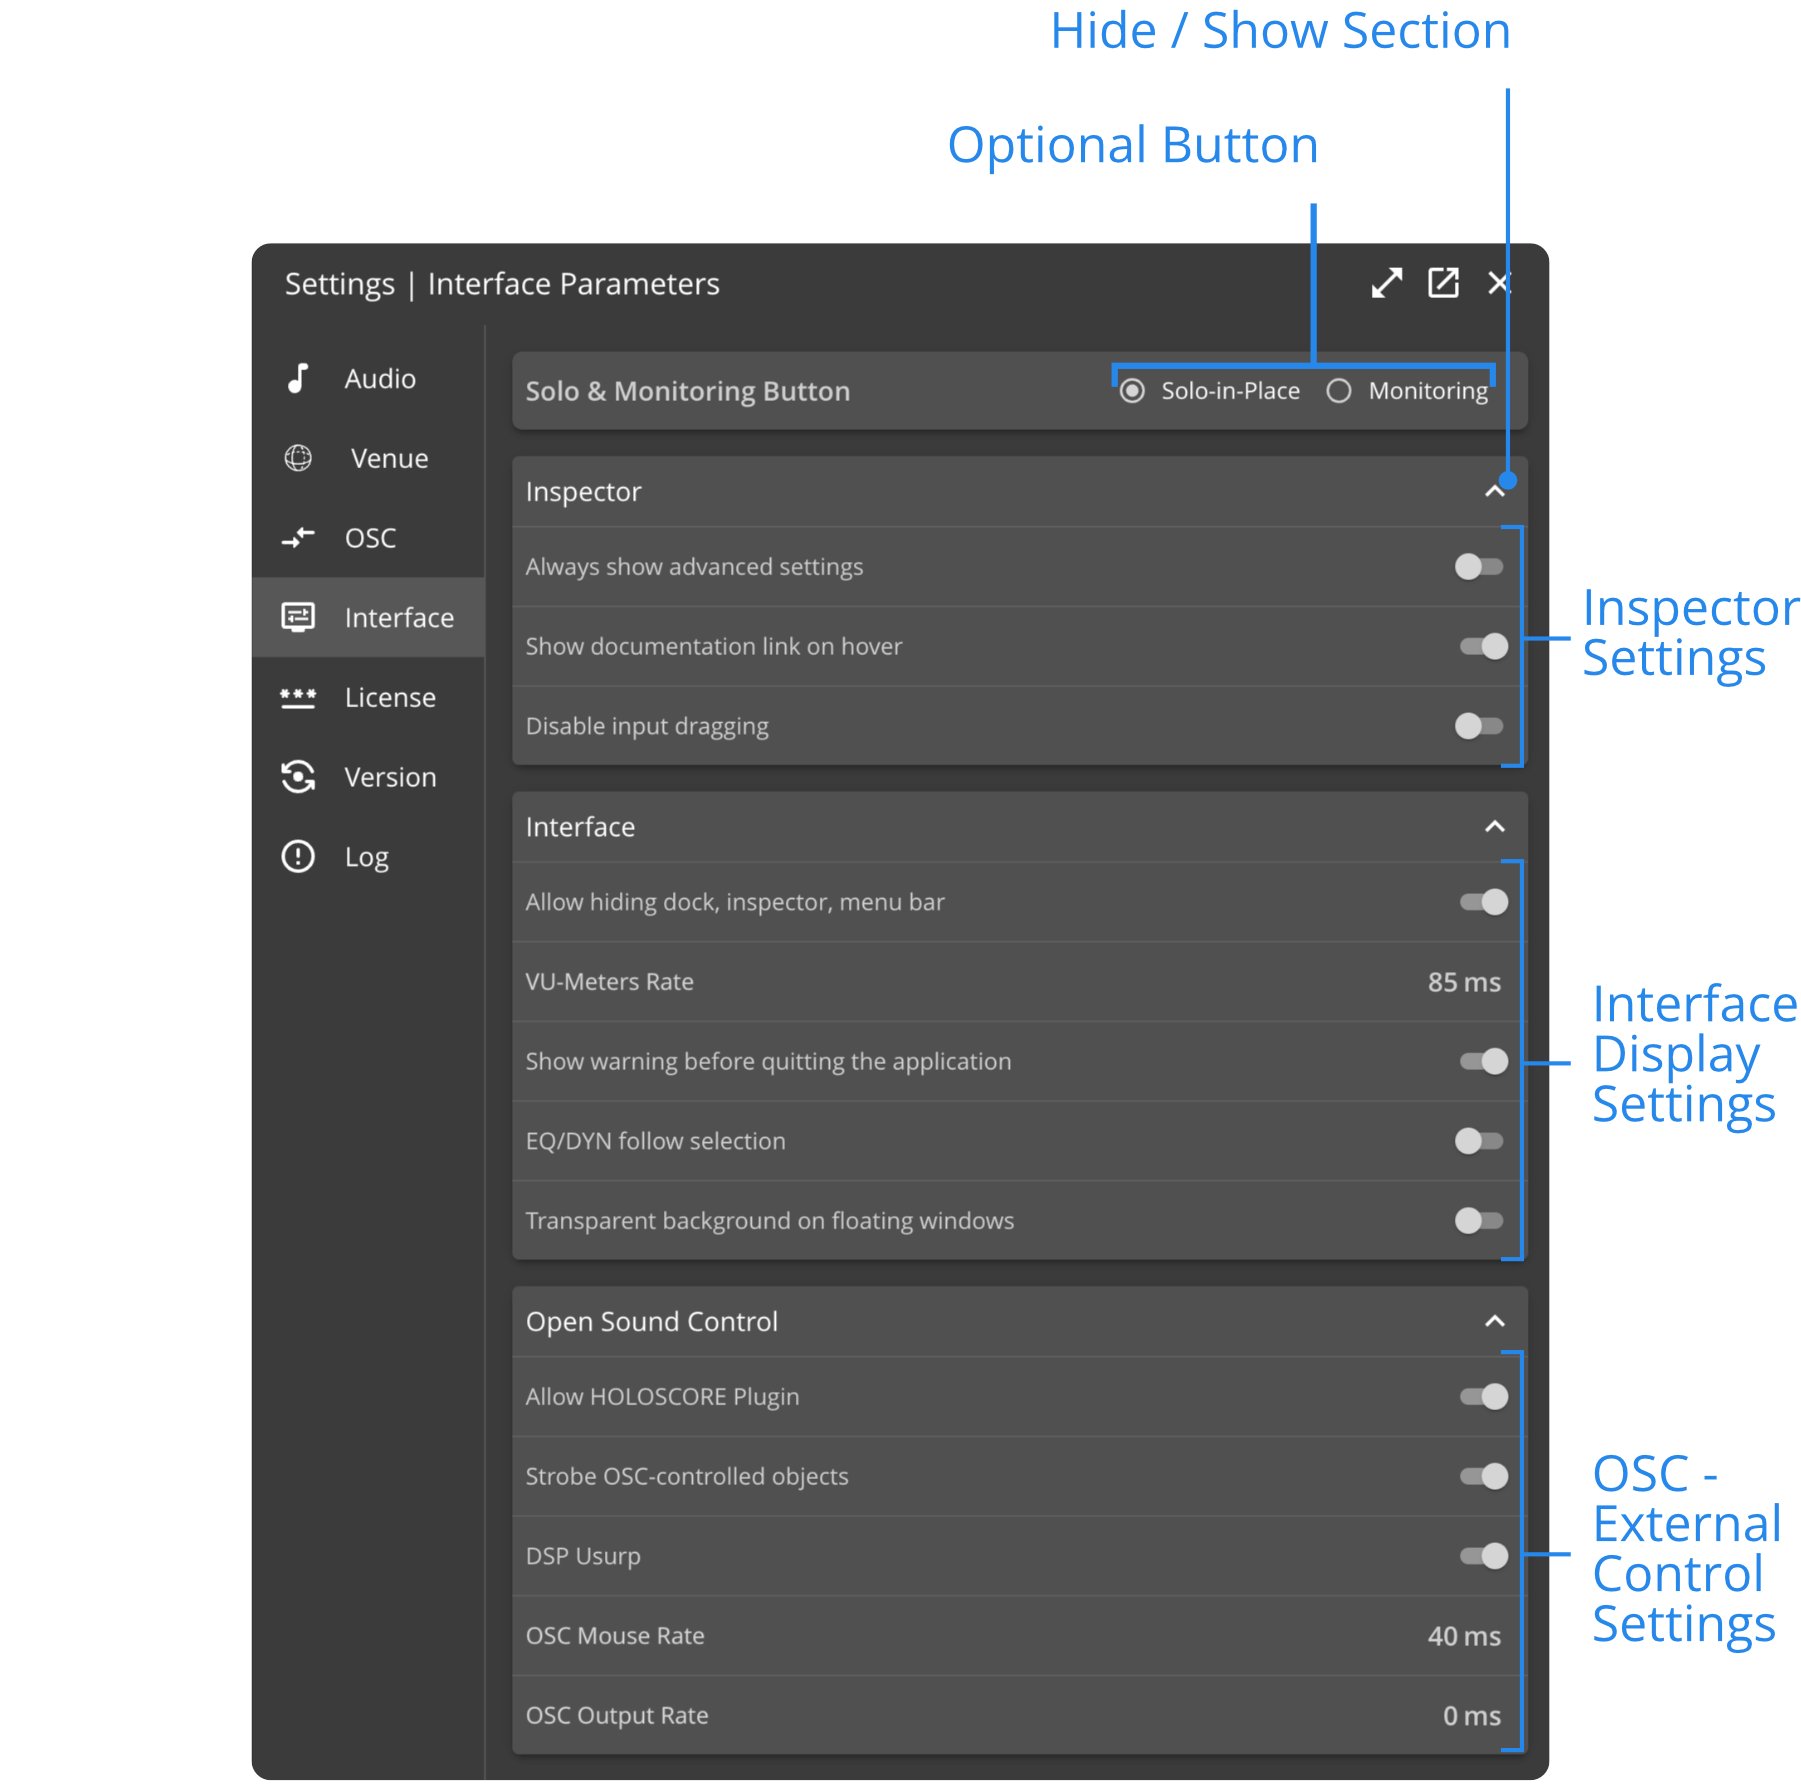
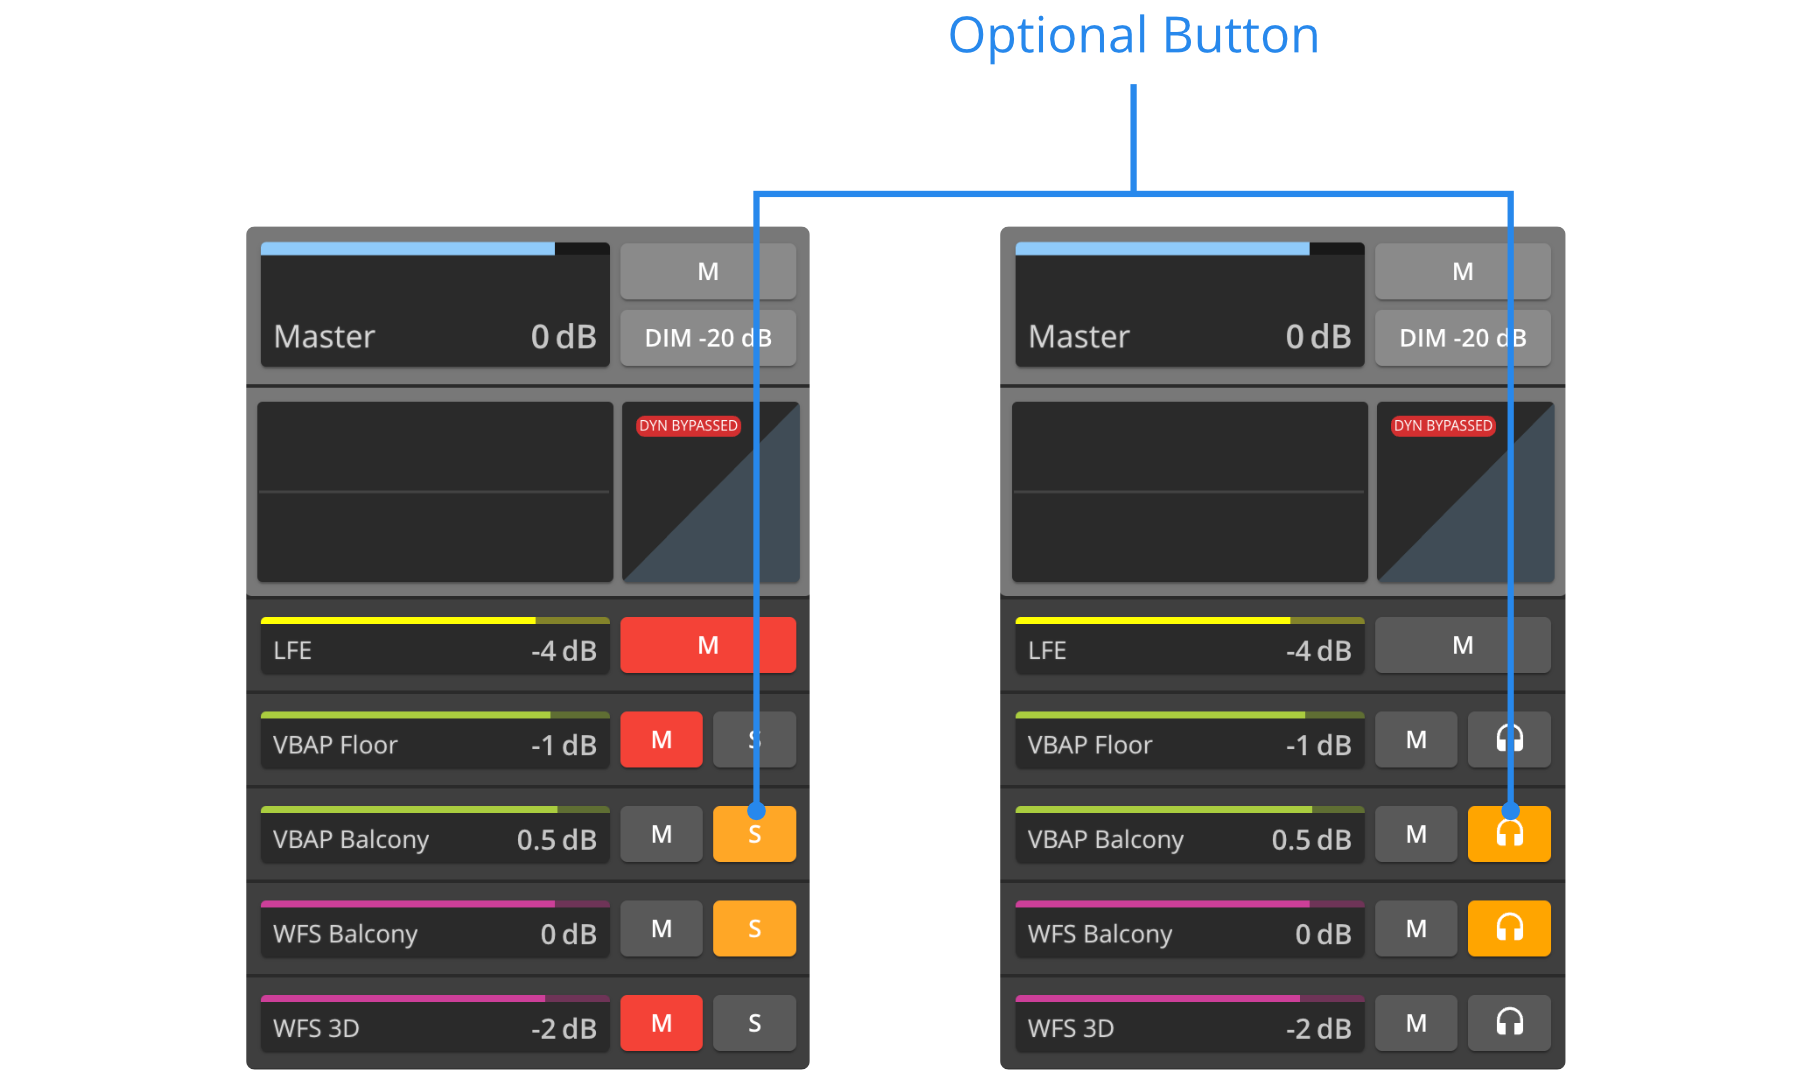
Solo & Monitoring Button
In the Main Page of the Inspector, or when you select a Bus, an Optional Button will be available, located on the right of the Mute button of any Bus. You can choose to use this button as a Solo-in-Place or Monitoring button. You can learn more about it in the Bus section of the documentation.
Inspector Section
Always show advanced settings
Activate this setting to show advanced settings throughout all of the interface, for all elements. When it is not activated, you can still show the advanced settings for one element by clicking Show Advanced Settings when available. You can display the advanced parameters on the following elements:
- WFS and HOA buses, in the Algorithm Tab.
- All buses, in the Reverb tab.
- In the Speaker Tab of the Routing Window
Show documentation link on hover
When activated, a lightbulb icon will appear if you hover long enough (2 seconds) over any parameter throughout the Interface. Click on it to access its corresponding entry in the offline documentation.
Disable Input Dragging
Many settings can be changed throughout the Interface with a click-and-drag. Activate this setting to deactivate this possibility. This can be useful to avoid any accidental value change.
Interface Section
Allow hiding Dock, Inspector, Menu bar
Activate this setting to be able hide the Dock, Inspector, and Option Bar thanks to the arrows located on their respective edges.
VU-Meters Rate
This setting adjusts the display rate of the VU-Meters that are displayed in the Venue and in the Mixer. Using a higher value can save graphical processing power on your computer, which can be useful on computers with low graphical processing power.
Show warning before quitting the application
In the Native app, activate this setting to be warned before quitting the application — even if you have saved your preset and project. We recommand leaving this setting on to avoid any accidental closing of HOLOPHONIX during a performance.
EQ/DYN follow selection
In the Inspector, you can choose to display the EQ or Dynamics of any Source or Bus as a floating window. When selecting another element, the floating window will by default display the EQ or Dynamics of the original element. Activating this setting will display the EQ or Dynamics newly selected element, therefore following any selection that you make in the Inspector, Mixer, Overview, or Venue.
This setting only affects EQ and Dynamics for Sources and Buses. It does not affect EQ and Dynamics for Outputs and and Reverb buses.
Transparent background on floating windows
By default, floating windows are slightly transparent. The interface behind it is therefore slightly visible. Deactivating this setting turns the floating window's background into a solid color based on your Interface theme.
Open Sound Control Section
Allow HOLOSCORE Plugin
The HOLOSCORE plugin detects and connects automatically to HOLOPHONIX. Therefore, if on a network you are using multiple instances of HOLOPHONIX (for example, a Processor and Native), you need to make sure that only one HOLOPHONIX instance has this option activated.
Strobe OSC-controlled objects
When Sources are controlled externally through OSC, they appear as blinking elements to easily identify which elements are being controlled through HOLOSCORE for example. Activating this setting turns the blinking off.
Use DPS Usurp
DPS Usurp is an OSC input filtering option useful when too many OSC messages are sent to HOLOPHONIX.
OSC Mouse Rate
When moving a source in the Venue, the interface sends messages to the audio engine (either locally on your computer for HOLOPHONIX Native, or remotely over the network for HOLOPHONIX Processor). With this setting, you can adjust the rate at which messages will be sent to the audio engine when moving a source.
OSC Output Rate
This setting adjusts the rate at which OSC messages will be sent to OSC Send destinations (configured in the Open Sound Control Tab), when moving a source in the Venue.
This setting is only applied to source positioning with the mouse in the Venue. It doesn't apply, for example, to faders in the Mixer View.
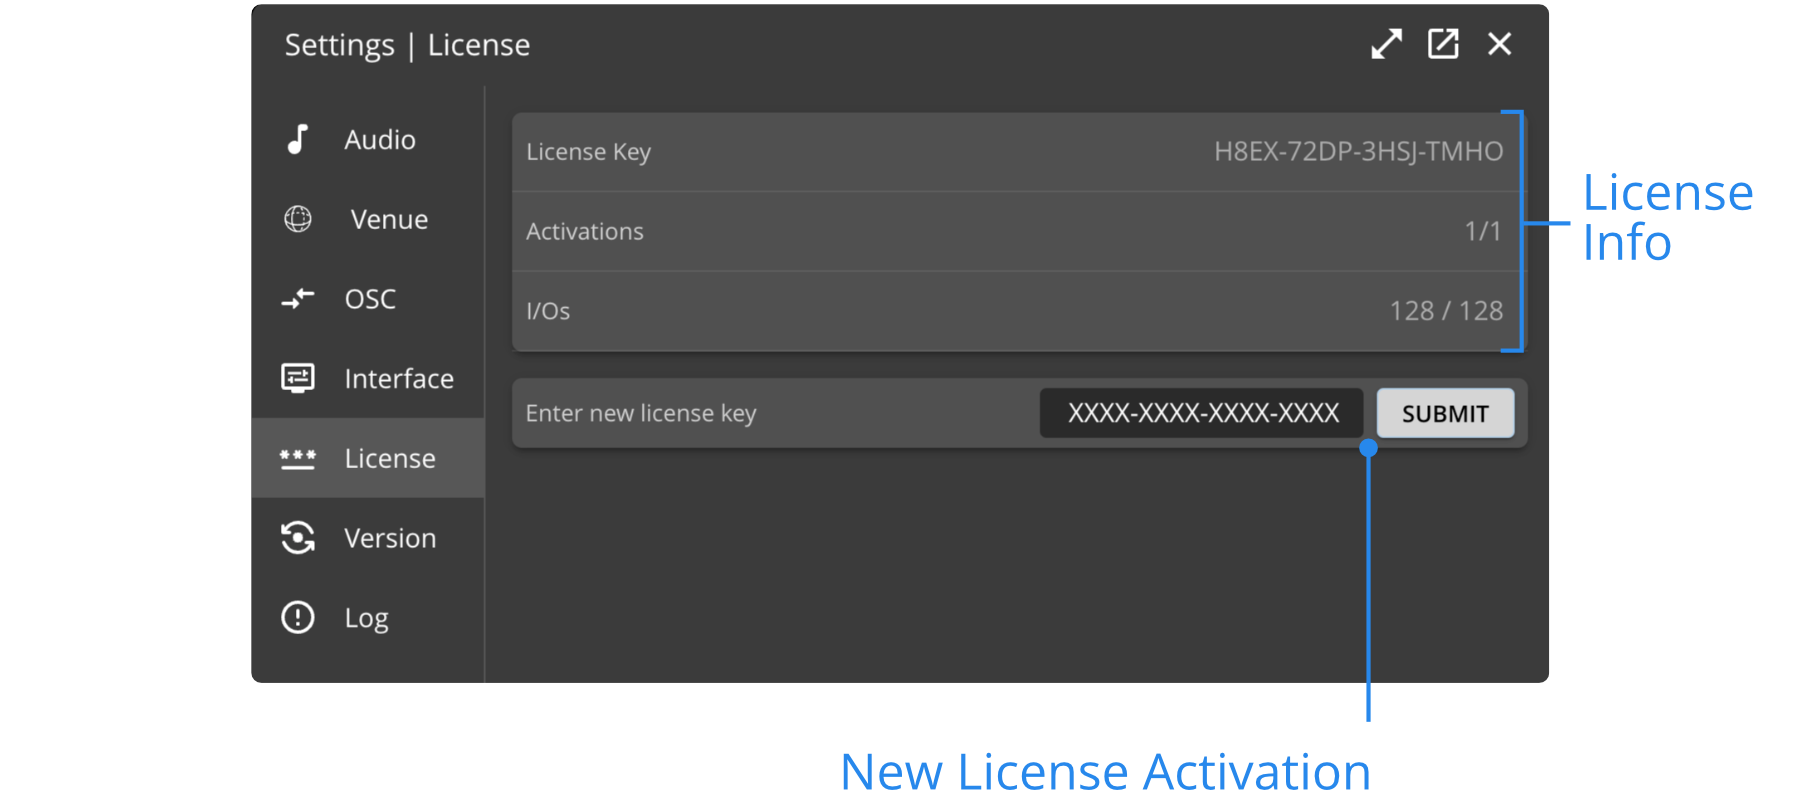
License Tab
- Processor
- Native
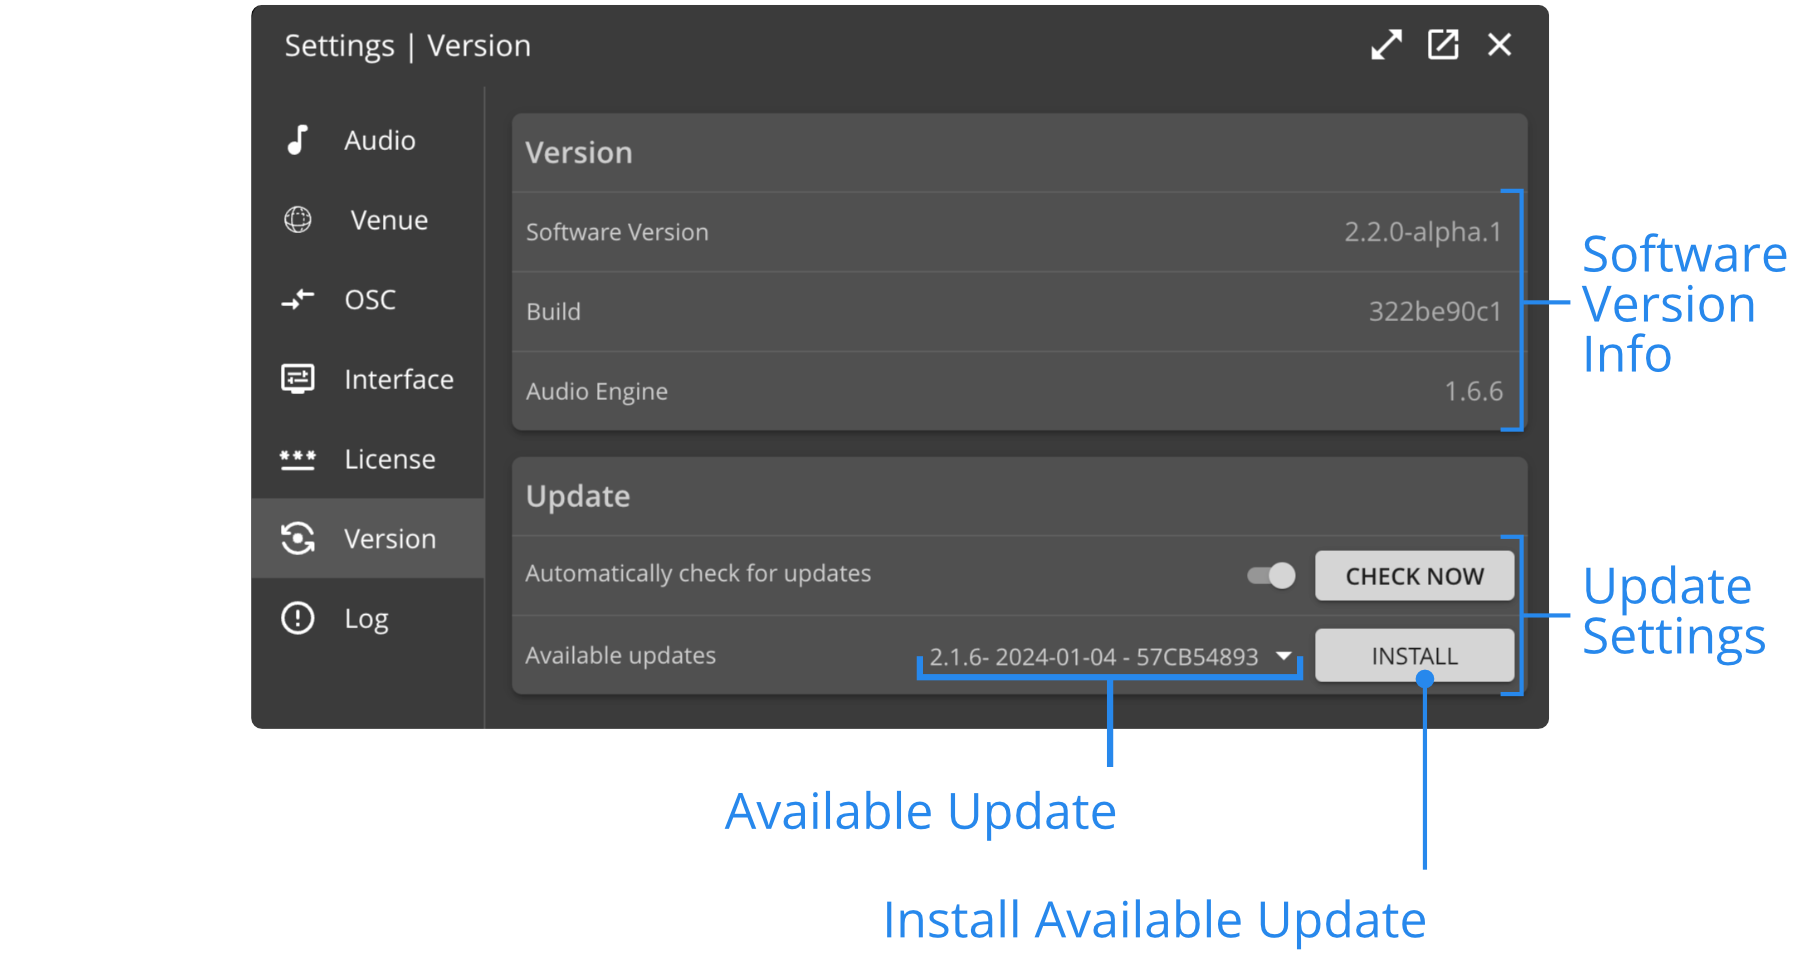
Version
Automatically check for updates or manually check if updates are available when your HOLOPHONIX Processor or Native App is connected to the Internet.
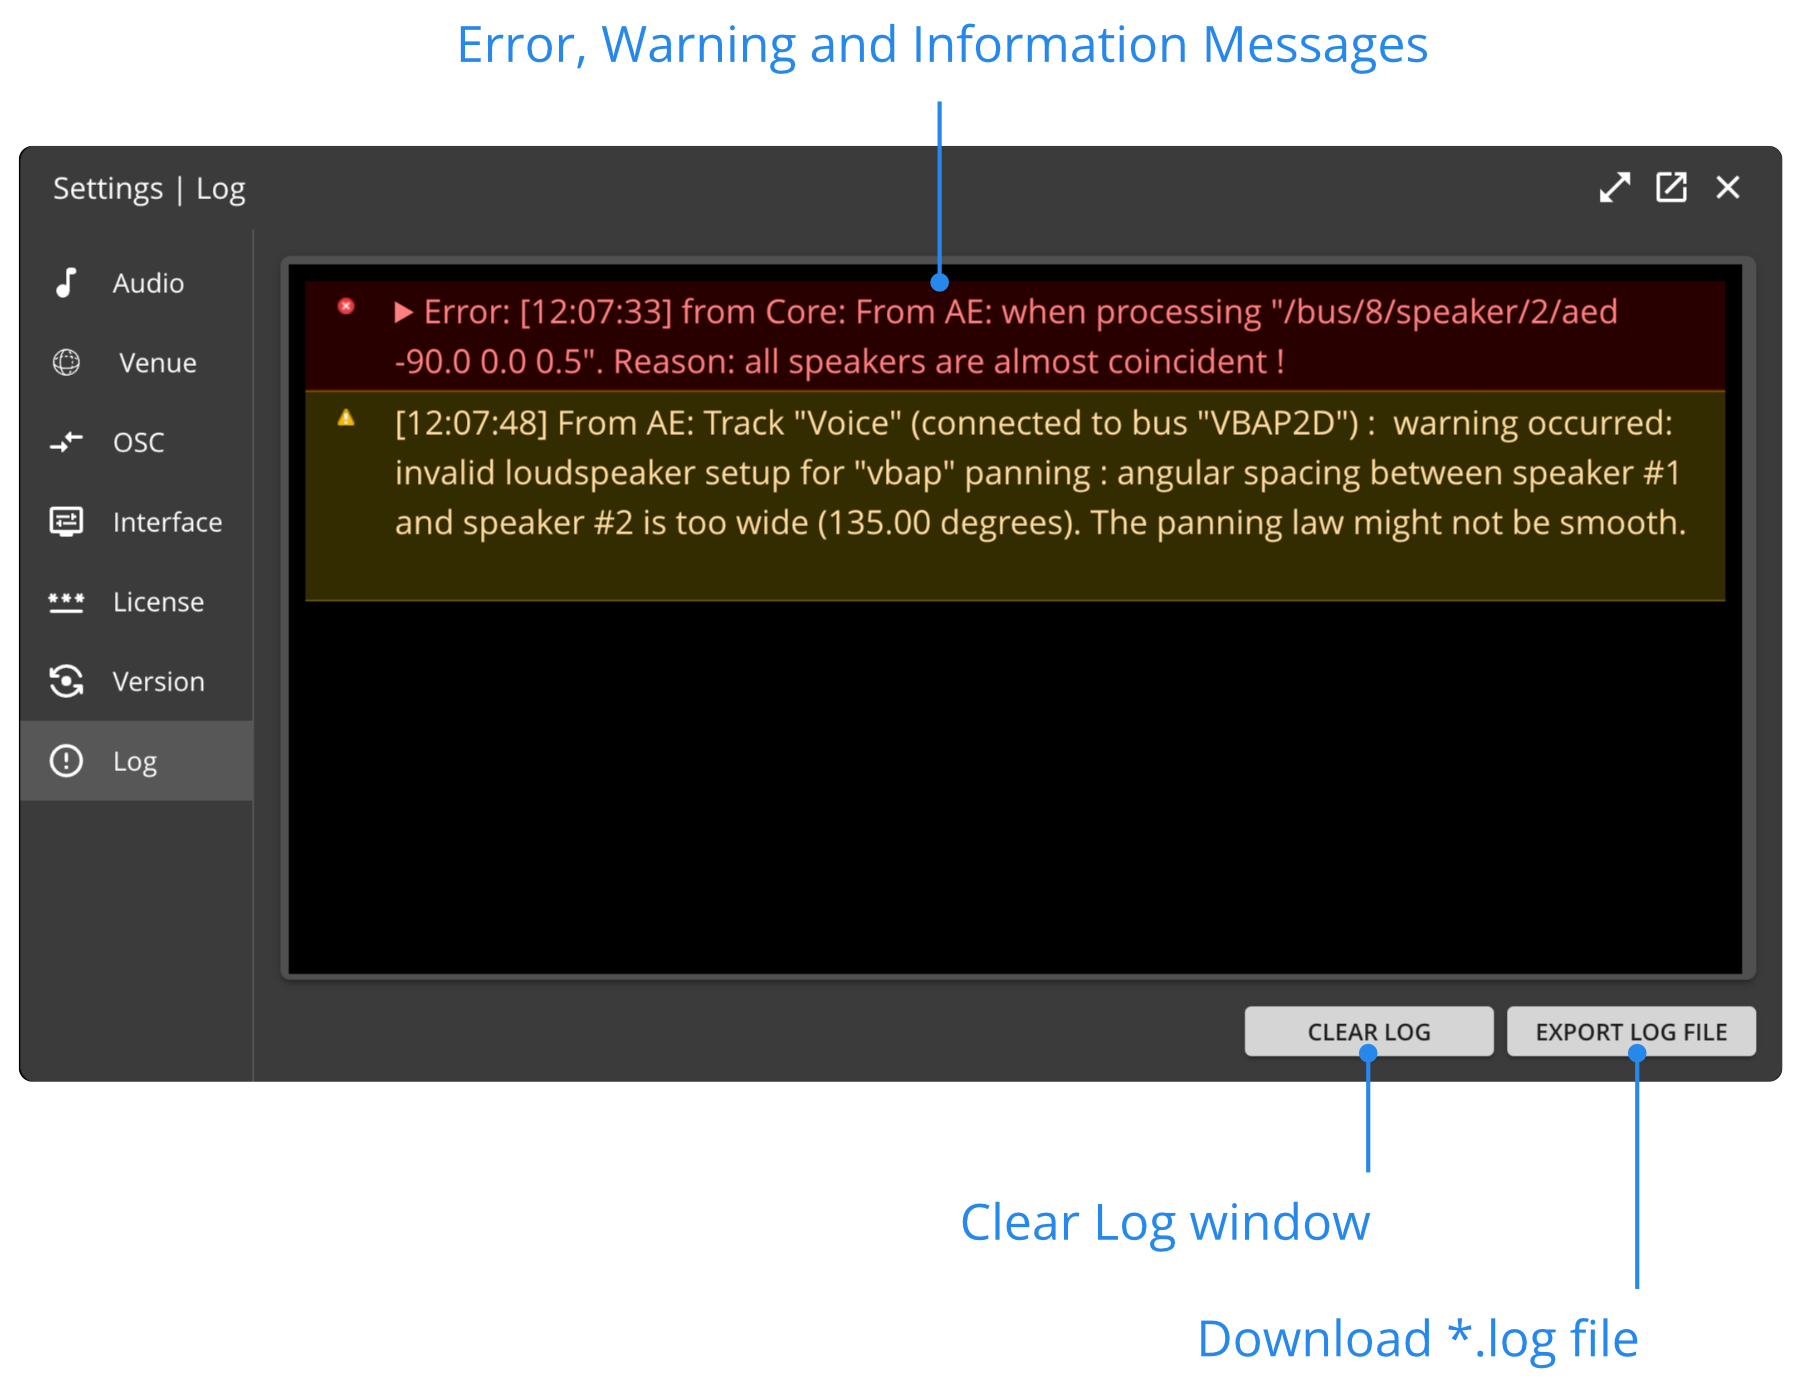
Log Tab
The Log tab shows messages to help identify the source of problems you might encounter. The error message often contains information about how to solve the problem if this is a configuration issue.
Use the Download button to export the logs to your computer and send them to user support if necessary.
Network Tab
- Processor
- Native
The Network tab in HOLOPHONIX Processors allows you to change the IP parameters of your network ports. Every port is set to Automatic (DHCP/Link Local) by default. If necessary, use this tab to manually configure each IP domain to best fit your workflow, or your venue pre-existing network
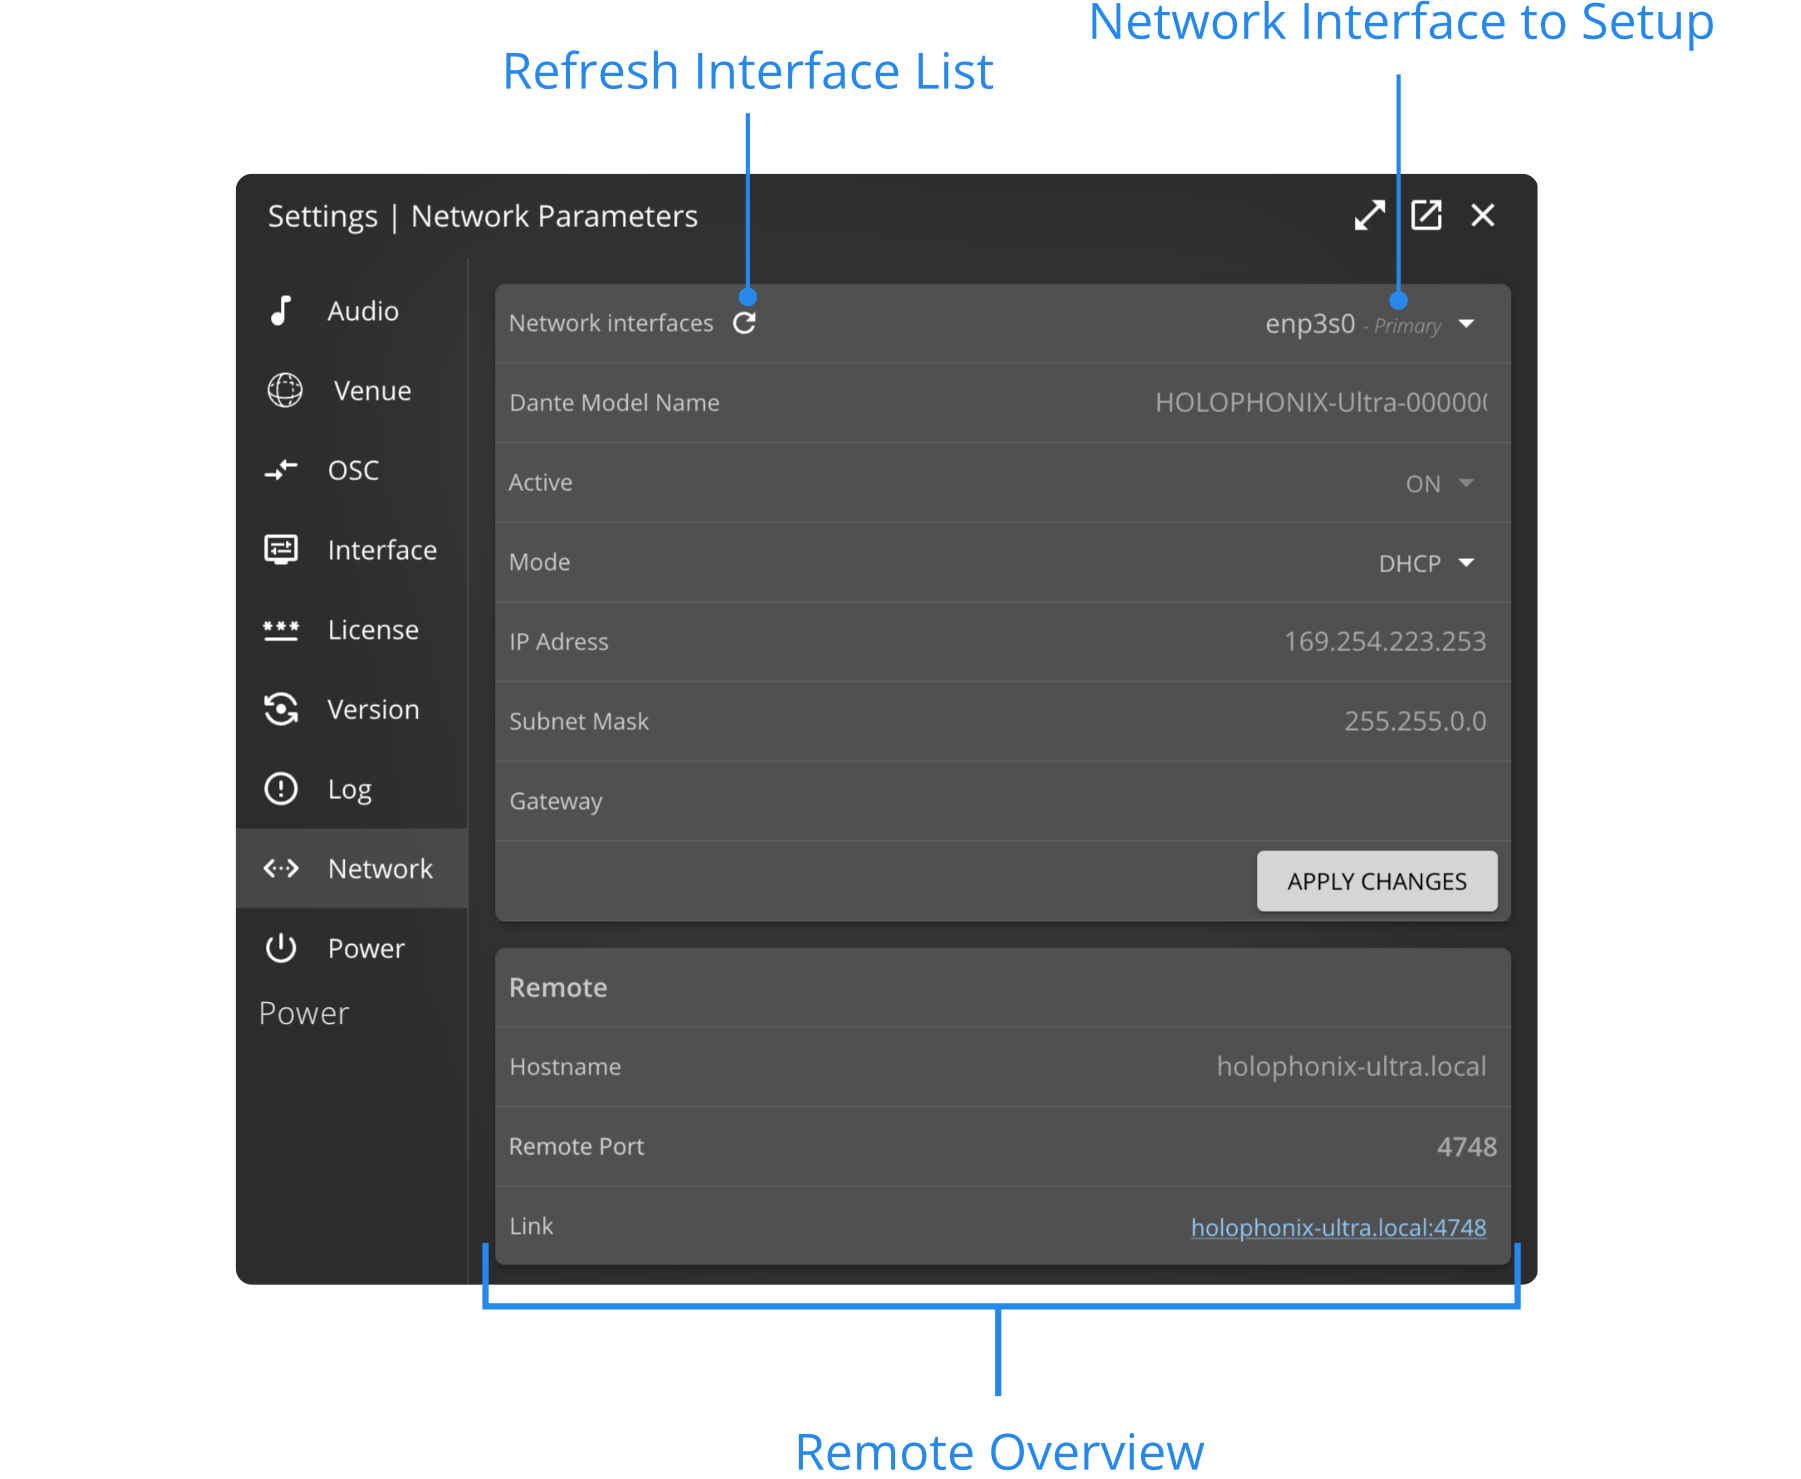
Mode
Static (Manual IP)
Set manually the desiered IP Address and Netmask.
Automatic (DHCP/Link-Local))
- If there is a DHCP server on your network, the network ports will get an address automatically in a given range of addresses (usually in the 192.168.x.x subnet).
- If there is no DHCP on the network, the link-local mode will assign an address in the 169.254.x.x range.
To configure a network port, it needs to be connected to a network, or it won’t appear in the Network interfaces list.
1. Select the Network interface you want to configure,
2. Choose between Automatic IP addressing (DHCP) or Manual IP addressing (Static)
3. In "STATIC" mode enter the IP and subnet mask
4. Click on SET to apply the new settings
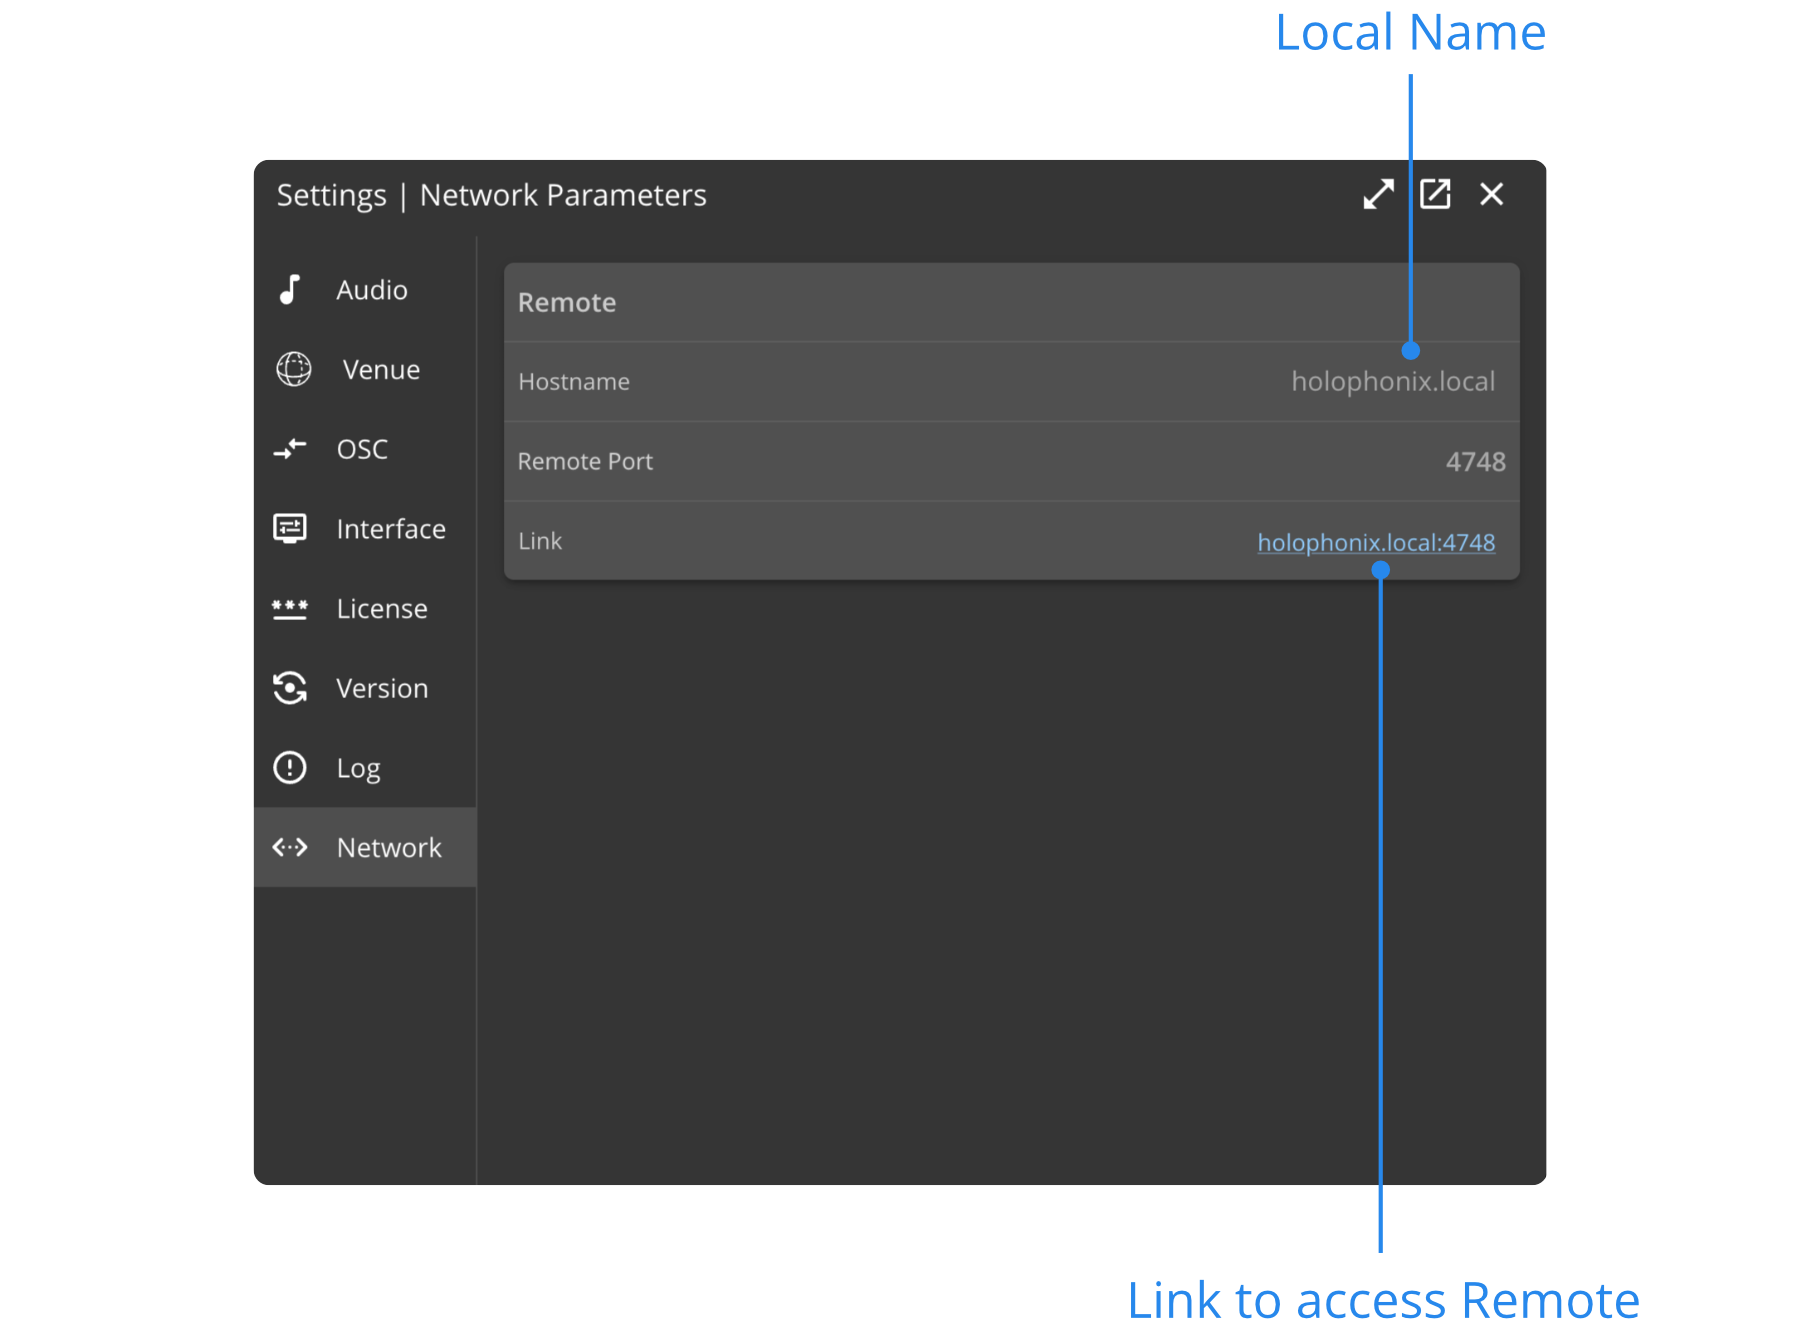
- On 1st generation of the HOLOPHONIX Processor, you can edit the settings of the 3 Remote ports.
- On the 2nd generation processor (HOLOPHONIX 128 & HOLOPHONIX 64), you can edit the settings of Remote, Dante Primary and Dante Secondary ports.
When changing the IP range of the Remote port, you will be disconnected from the remote control interface. You will have to change your the IP Address of your computer.
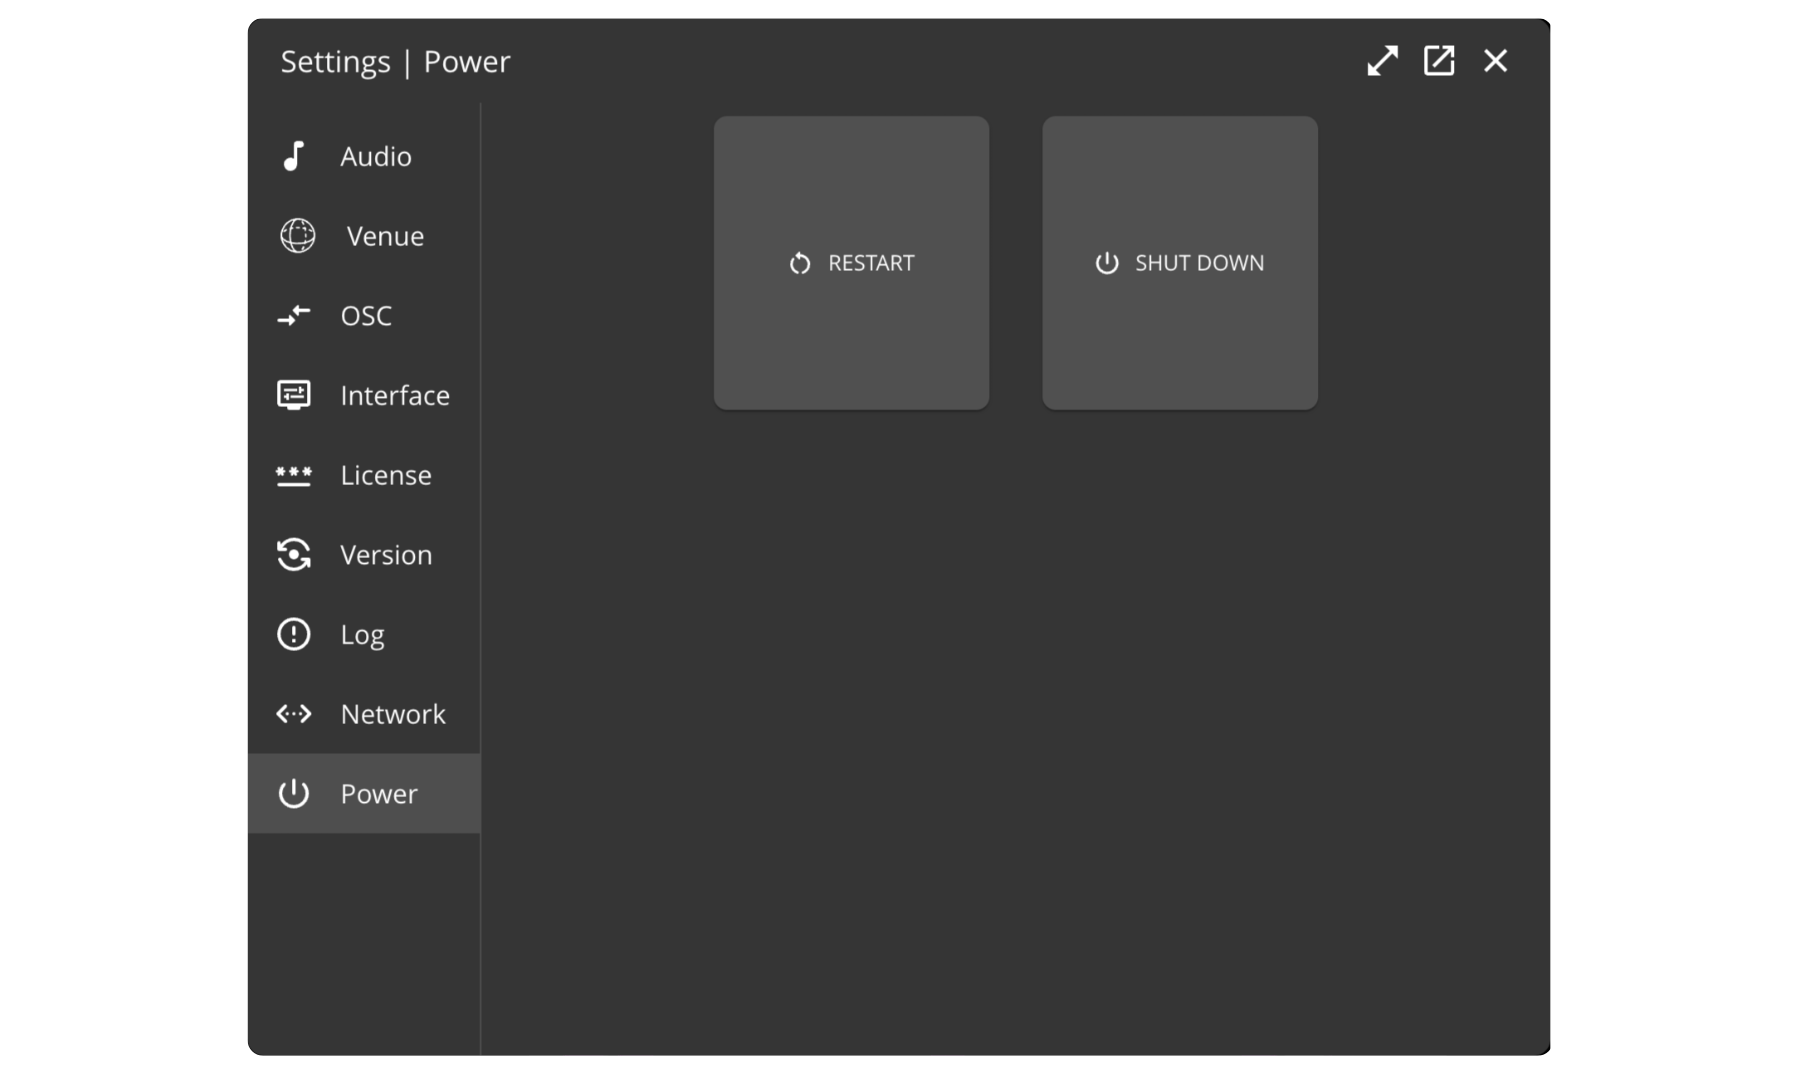
Power tab
The Power tab is exclusive to HOLOPHONIX processors.
From this tab, you can access the SHUT DOWN or REBOOT options.