Inspector
The Inspector displays the settings for all the following elements:
- Sources & Direct-routings
- Spatialization Bus
- Speakers
- Master Bus
- Bass management (LFE)
- Monitoring Bus
You can hide the inspector with the arrow located on its left edge. To restore it to its original size, click on that same arrow.
Structure
Within the search bar, on the left, you will see the Pin icon. Activating the Pin unlinks the Inspector from the selection in the Venue. Pinning an element therefore forces the Inspector to display its page, even if you select another element in the venue. This is very useful when you want to tweak a Spatialization Bus' parameters while moving a source, for example.
At the very top of the Inspector, you will find the search bar, which allows you to pick the elements you wish to select. Press the Shift key to select multiple elements.
The Inspector is then divided into two sections: the header and the tab section.
- The Header displays a basic overview of your current selection, or an overview of the Master if nothing is selected.
- The Tab section displays additional parameters based on the contextual tab you have selected at the very bottom of the inspector.
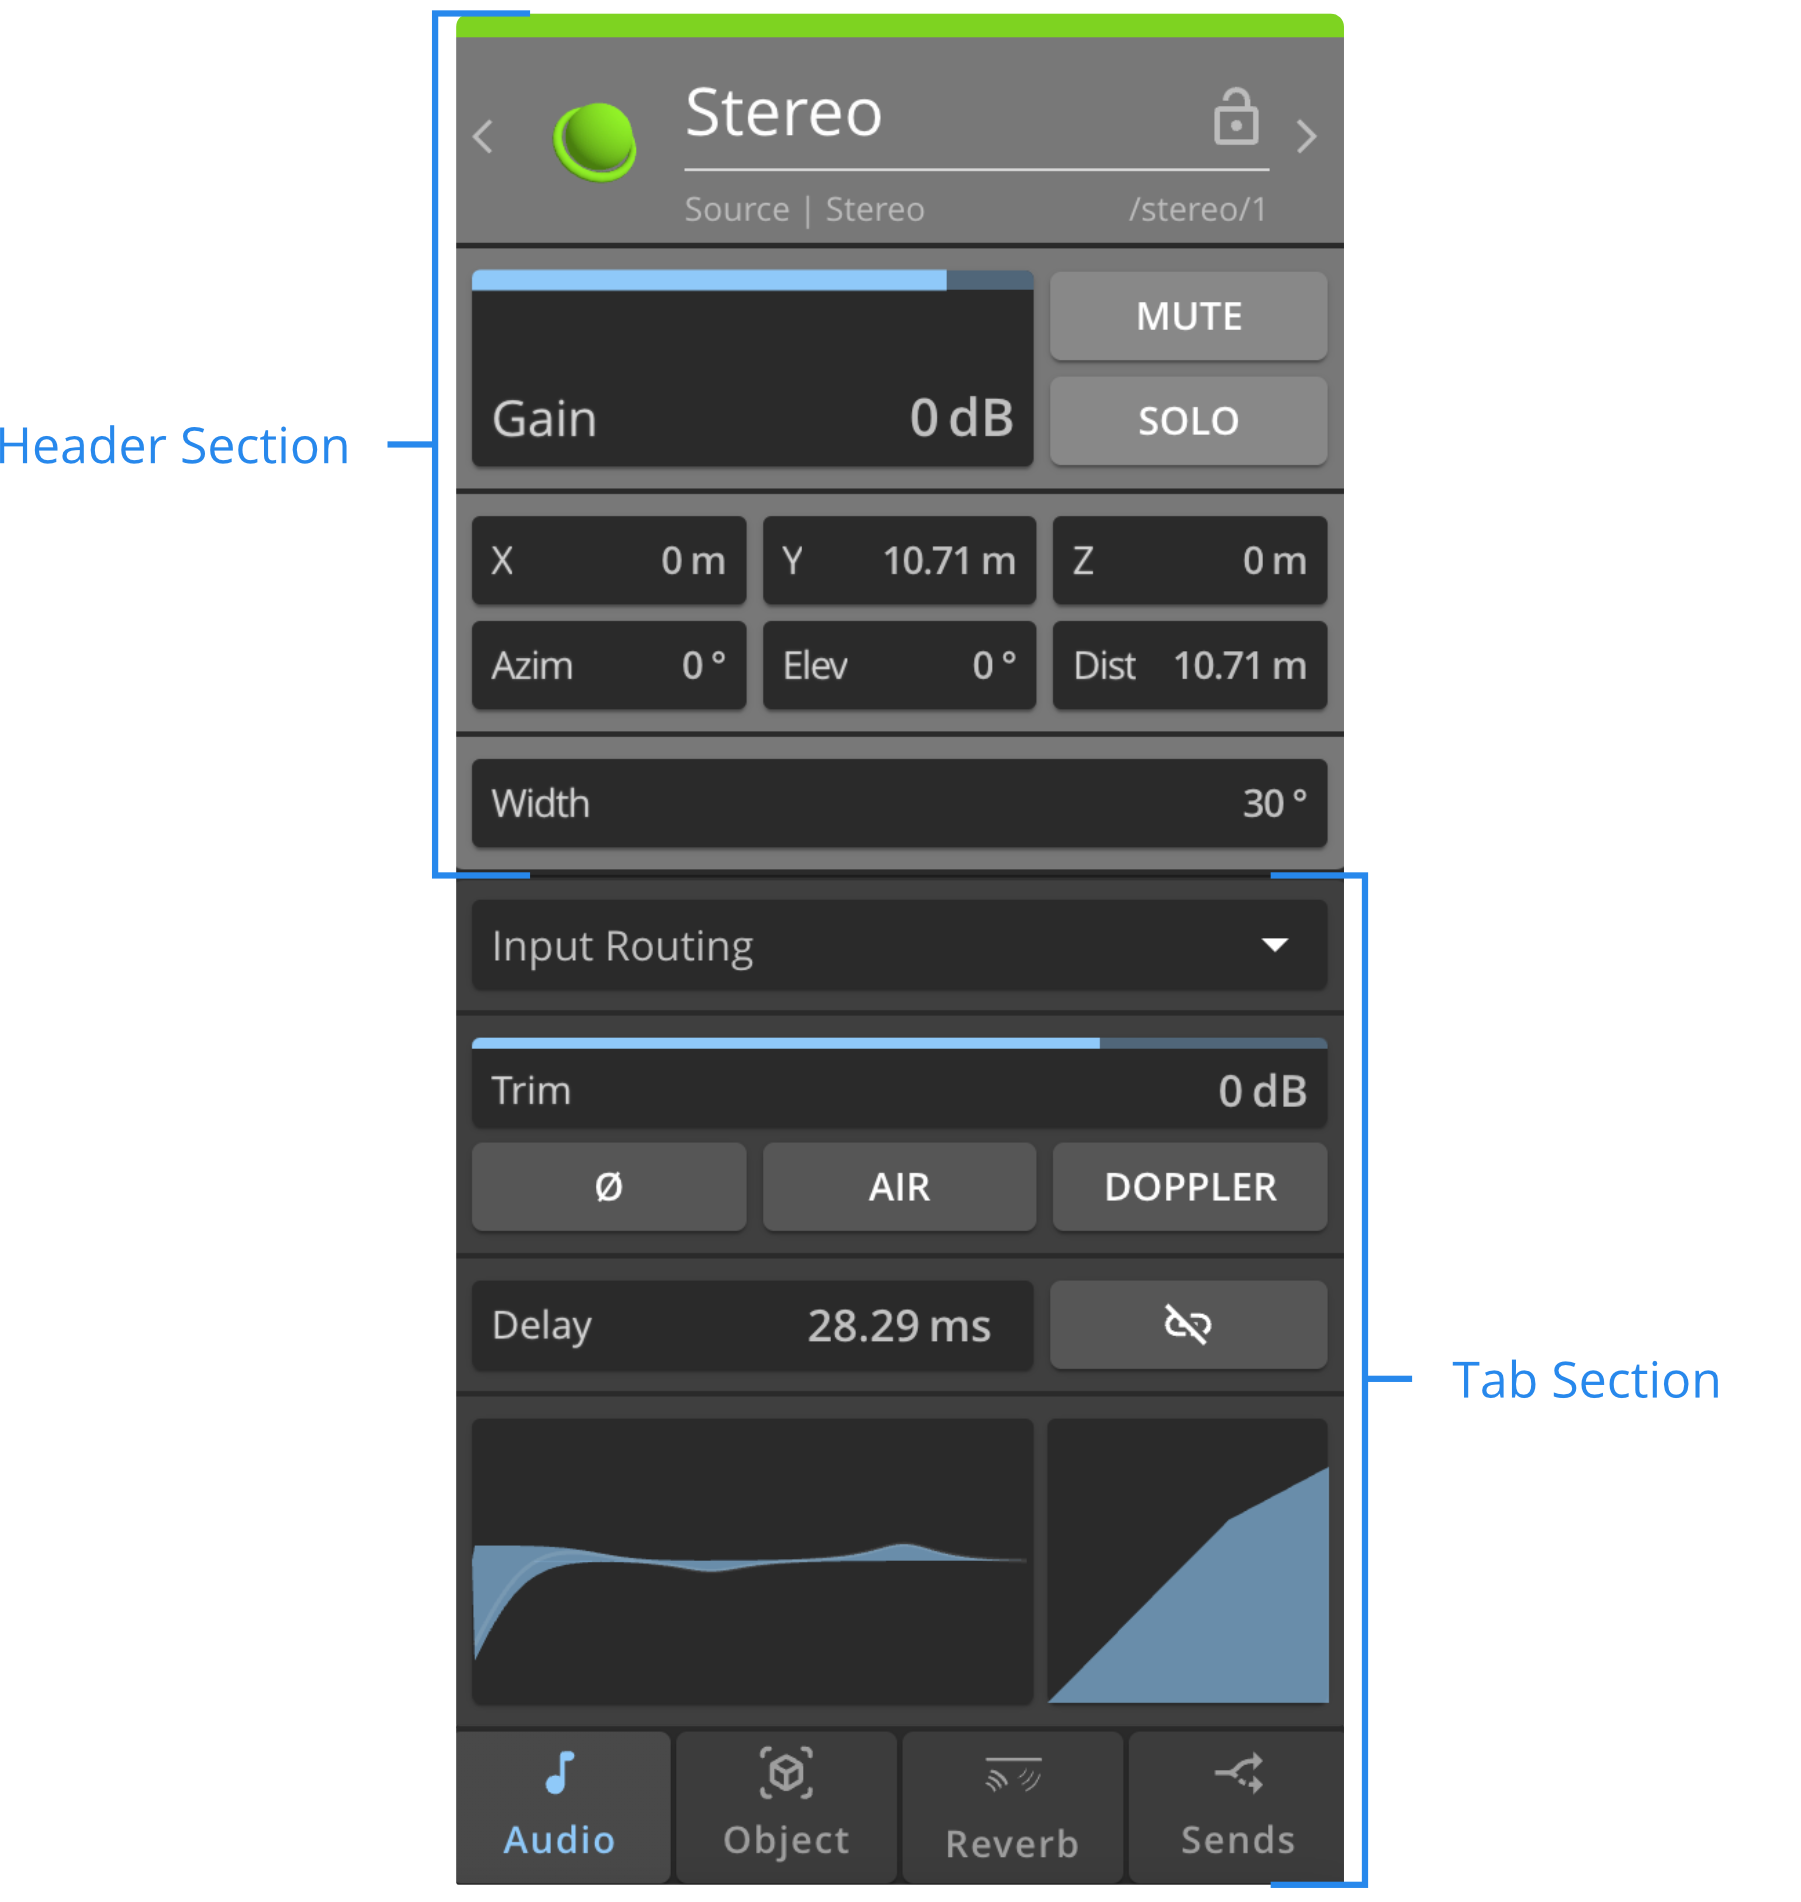
The components of the header and parameter sections are detailed in the following sections.
Header Section
Based on your current selection, the header section will look different.
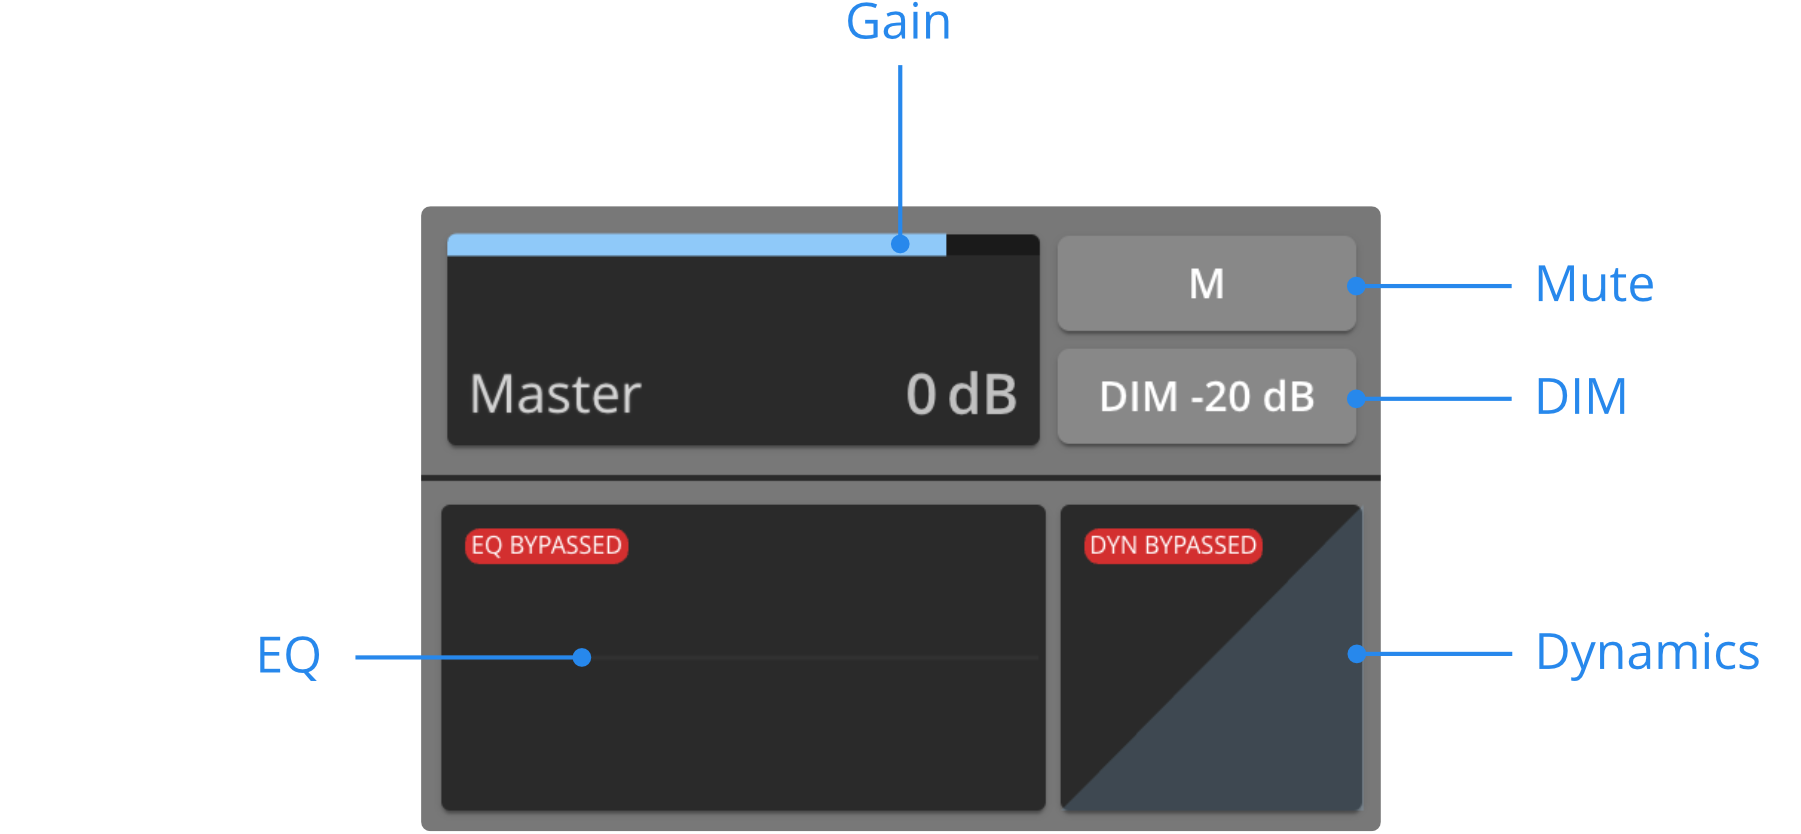
Main Page
When nothing is selected, the header displays what we call the “Main Page”, with the general parameters of the Master, including its EQ and Dynamic options.
Element Selection
With HOLOPHONIX 2.1.5, you can now use Shift + Left Arrow or Right Arrow to cycle through the inspector selection.
-
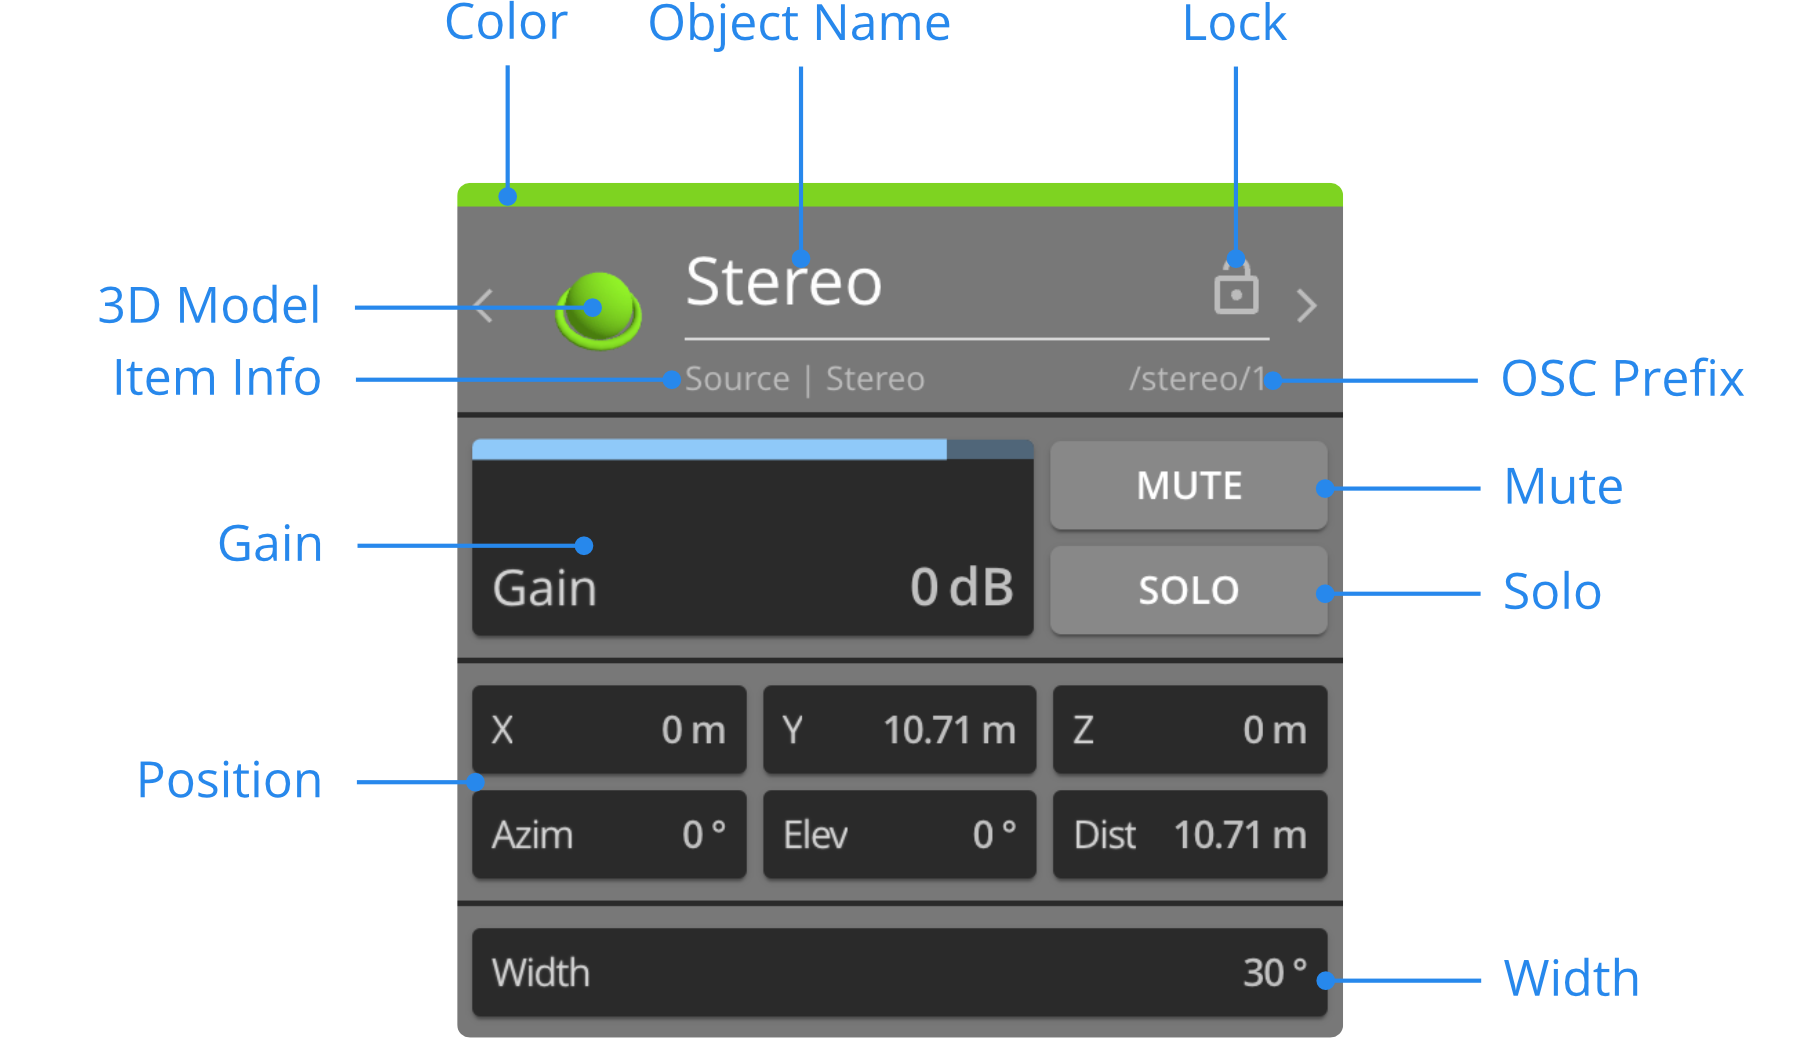
Whether you have selected a Speaker, a Source or a Spatialization Bus, the upper part of the Header always shows essential elements for easy identification.
-
The lower part of the Header depends on your selection. In the example below (a stereo Source), all of the possible parameters you can encounter are shown.
Check the Sources, Speakers, and Bus page to learn more about the specific Header parameters for each element.
You can edit, export or import most of the element's parameters from the Overview.
Header - Identification ElementsName
This field displays the name of the selected element. You can edit the name directly from this field.
Lock
Use this button to lock an element and prevent it from being edited throughout the preset. However, even if an element is locked, it can still be edited with Open Sound Control messages.
Color
Click on the color dot to change the selected element's color. The selected color will be applied to the element's display through the different windows of the interface.
You can simply pick a predefined color from the color palette, or use a custom color setting. To set a custom color, first use the Hue slider to choose a primary color, then adjust it with the gradient box.
You can also use the RGB values or hexadecimal color code fields to set the color. They are convenient when you need to copy a color to another element.
OSC Address
This field shows the selected element's OSC Address to use when you want to control a parameter of that element. You can refer to the Open Sound Control section for more details.
If you perform a multiple selection that includes both Sources and Speakers, you will be prompted to choose between addressing the multiple Sources, or the multiple Speakers.
If you have performed a compatible multi-selection (only source tracks, only speakers, an existing group), the OSC address will incorporate the correct syntax.
Tab Section
This section displays additional parameters for your selection, and is organized based on the tabs located at the very bottom of the inspector. According to what you have currently selected, different tabs will appear, giving you access to the full range of parameters for your master or selection.
Main Page
When you are viewing the main page (if you have not made a selection), there is only one tab available: Master. It lists all the buses in your preset.
Source Selection
If you have selected a Source, four tabs are available: Audio, Object, Reverb, and Sends.
To learn more about the Inspector parameters of each tab, you can check:
- parameters common to all Sources
- parameters specific to Virtual Sources
- parameters specific to Ambisonics Sources
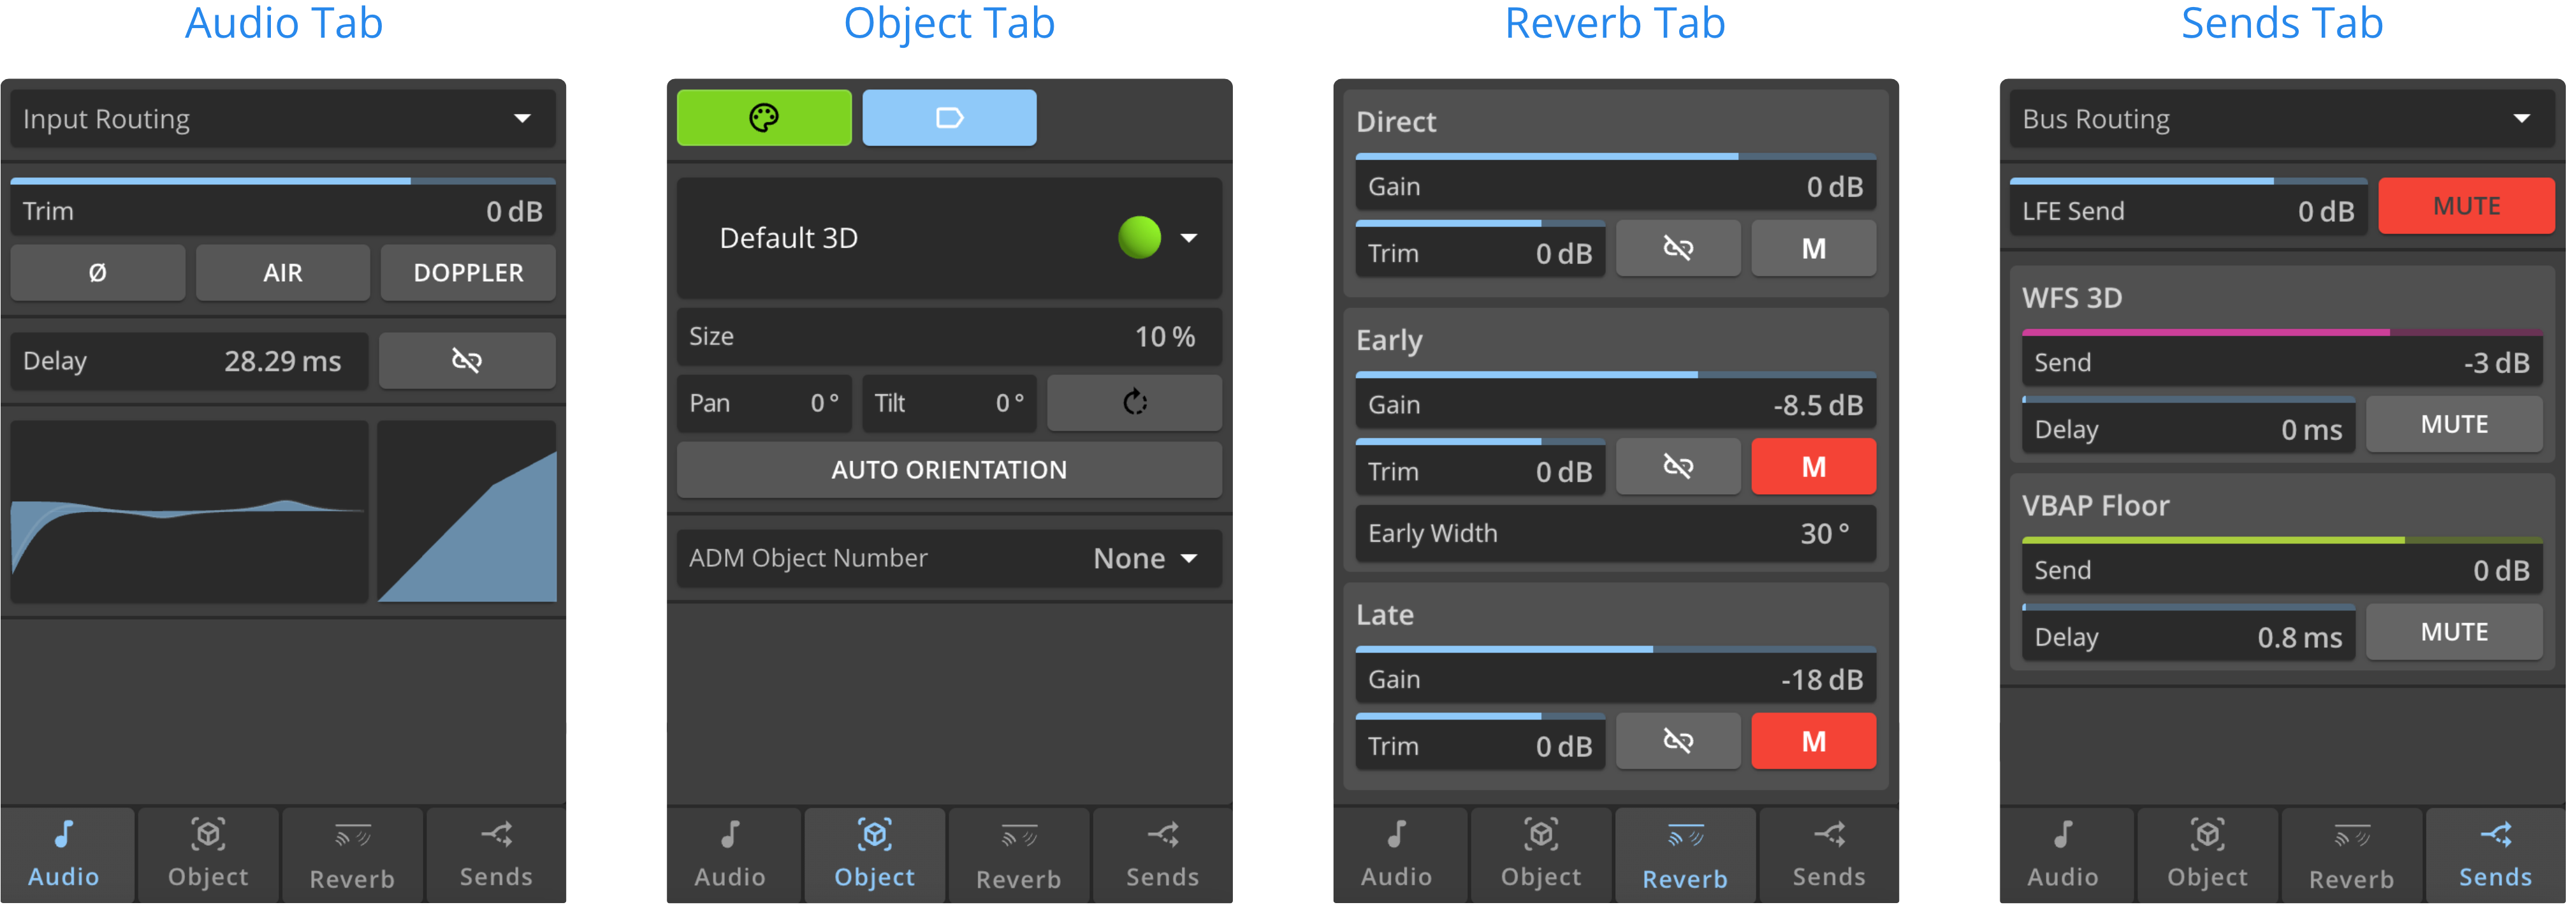
Audio
The Audio tab shows parameters related to audio: Trim, Phase, Air, Doppler, Delay, Link & Unlink, and EQs and Dynamics. You can also perform Quick Routing | Input to Source from there.
Object
The Object tab shows parameters related to the appearance of the Source: 3D model, Color, Label Visibility and Object Visibility, Size, Pan, Tilt, and Auto-Orientation.
Reverb
The Reverb tab shows parameters to adjust your Source's behavior with the Reverberation engine : Direct Gain, Reverb Send, Close to Far Slider and more parameters in advanced settings.
Please note that the Reverberation Engine is associated to all buses in your preset. This means that this tab applies the Reverb parameters of your Source to all of Buses.
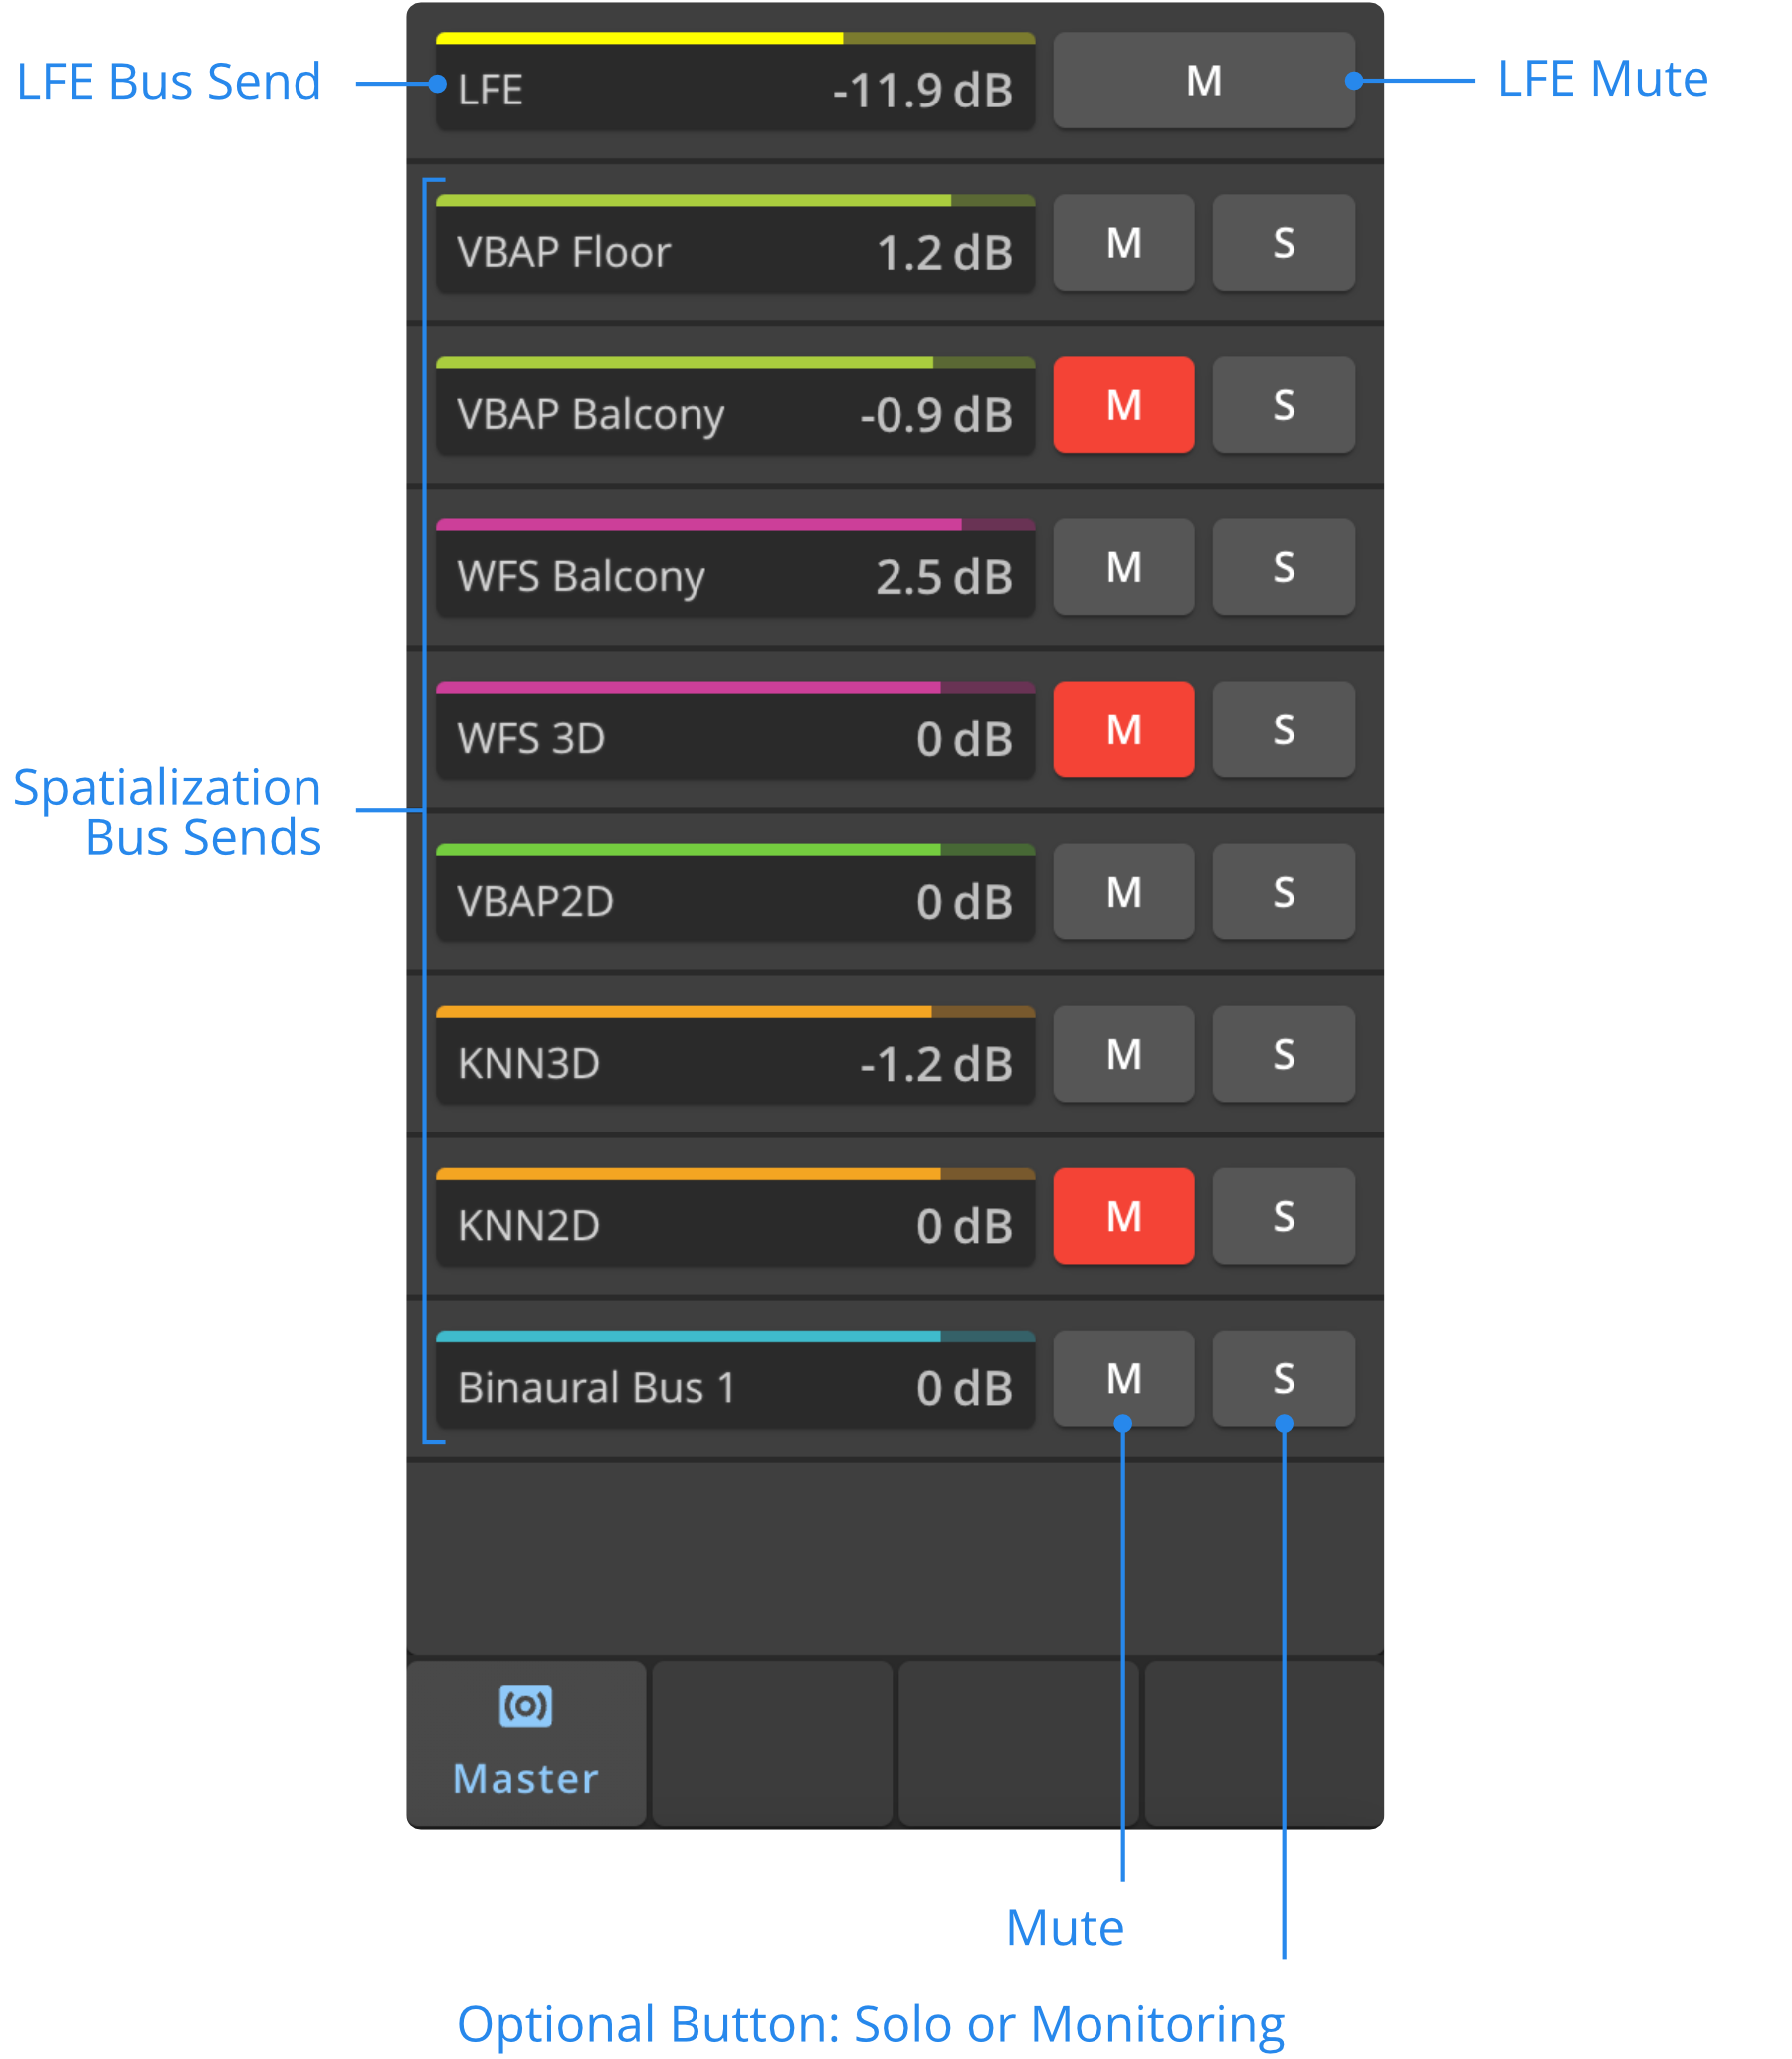
Send
The Sends tab displays parameters relevant to the buses your source is sent to. You can perform quick bus routing, adjust the LFE send (or mute it) and adjust the Send, Delay and Mute options for the different buses to which your source is routed to.
Speaker Selection
If you have selected a Speaker, two tabs are available: Object and Sends. The Reverb tab is greyed out because it is not relevant to speakers.
To learn more about the Inspector parameters of each tab, check the Speaker page of the documentation.
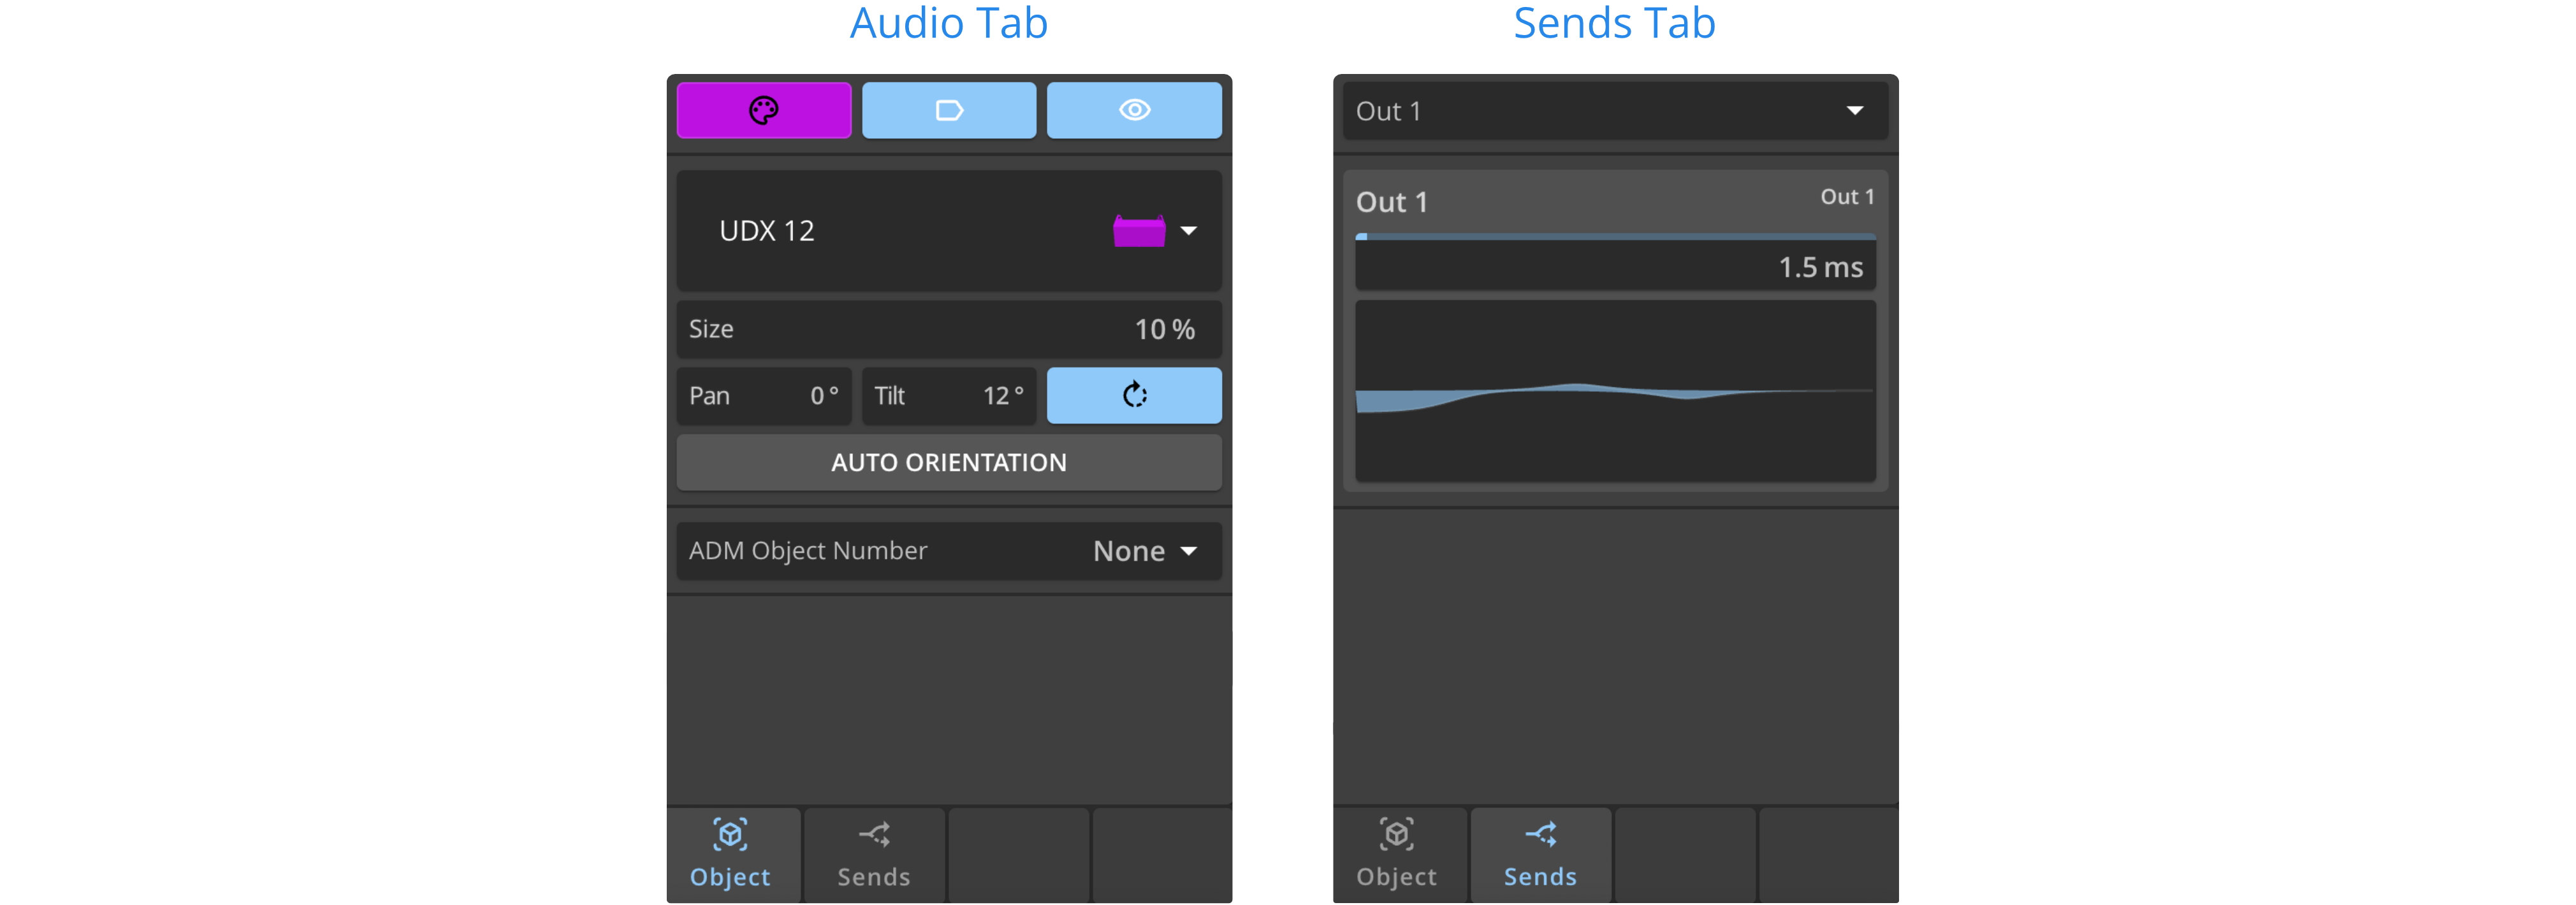
Object
The Object tab shows parameters related to the appearance of the Speaker: 3D model, color, label, visibility, size, pan, tilt and auto-orientation.
Sends
The Sends tab lets you perform quick routing to the Outputs and adjust EQ and delay for each send.
Bus Selection
If you have selected a Bus, four tabs are available: Audio, Bus Algorithm, Reverb, and Speakers.
To learn more about the Inspector parameters of each tab, check the Bus page of the documentation.
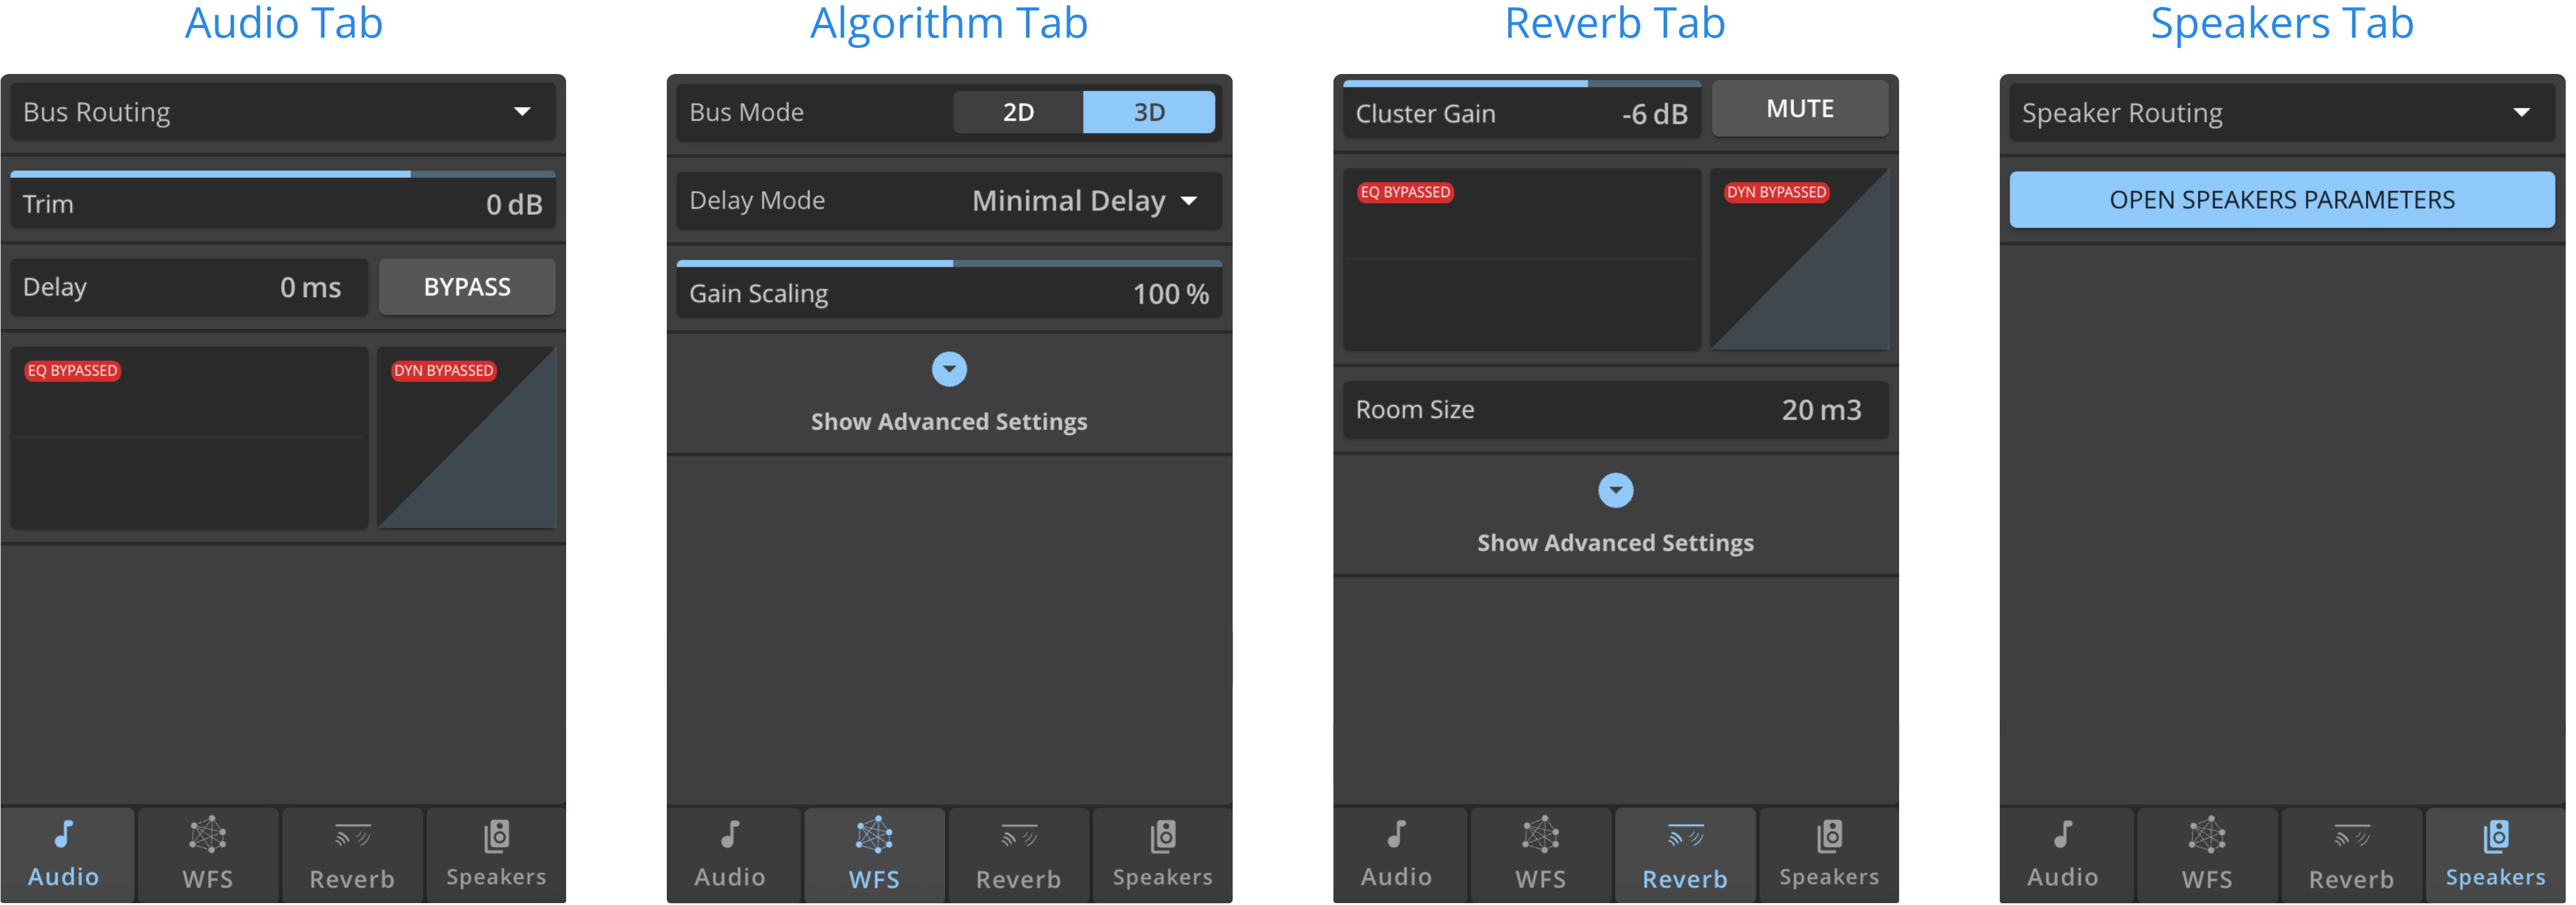
Audio
The Audio tab shows parameters related to audio: Trim, Delay, EQs and Dynamics. You can also perform quick Source to Bus routing, to choose which Sources are routed to the Bus.
Bus Algorithm
The Algorithm tab shows parameters to adjust the algorithm used in the current Bus. The available parameters will therefore be very different based on your choice. You can find a list of the different spatialization algorithms to learn more about their specific parameters.
Reverb
The Reverb tab shows the global settings of the Reverberation engine along with settings for the associated Bus. For more information, refer to the Reverberation section.
Speakers
The Speakers tab lets your perform quick Bus to Speaker routing, and gives you access to “Speakers Parameters” if you want to edit the loudspeaker's position, gain, and delay within this bus, exclusively. To learn more about it, check the Speakers Parameters.
Advanced Settings
Since HOLOPHONIX 2.2, you can no longer activate the Advanced Settings from the Option bar. You can however choose to display them for individual elements by clicking Show Advanced Settings when available. You can activate the advanced settings for the whole preset from the Preference Window.
When advanced settings are activated, you will see more options in the Inspector for the following elements:
- In the Speaker Tab of the Routing Window
- All buses, in the Reverb tab.
This option only controls the display of settings. Therefore, if you apply advanced settings to a parameter and then go back to Standard Settings, the parameter will keep its advanced setting.
Throughout the documentation, the parameters accessible in Advanced Settings mode will be indicated by the badge * after their name.
For example, in the HOA Spatialization Bus page of the documentation, Level Compensation is available in Advanced Settings, unlike Decoder Type :