External Link

Version 2.3 expands compatibility with professional audio equipment, including integration with Yamaha mixing consoles from the QL, CL and DM series. The External Link feature enables seamless integration between HOLOPHONIX and Yamaha mixing consoles, allowing for efficient control of your HOLOPHONIX session directly from your Yamaha console.
Overview
The External Link feature creates a bidirectional connection between HOLOPHONIX and Yamaha mixing consoles, streamlining your workflow by allowing you to:
- Control HOLOPHONIX sources from your Yamaha console
- Synchronize labels and colors between both systems
- Manage faders and mutes
- Control source positioning using Pan/Surround controls
- Save connection states within HOLOPHONIX presets
Control of an HOLOPHONIX Source by External Link and HOLOSCORE (or OSC commands) in the same time is not yet fully supported as of version 2.3.2. It is recommended to control a source's parameter (position for example) by External Link or HOLOSCORE only.
Features matrix
| Features | CL/QL Series | DM3 | DM7 | DM7 + DM7 Control |
|---|---|---|---|---|
| Fader Control | ✔️ | ✔️ | ✔️ | ✔️ |
| Mute Control | ✔️ | ✔️ | ✔️ | ✔️ |
| Label Sync | ✔️ | ✔️ | ✔️ | ✔️ |
| Color Sync | ✔️ | ✔️ | ✔️ | ✔️ |
| Pan : X Position (Stereo) | ✔️ | ✔️ | ✔️ | ✔️ |
| CSR : Y Position (Stereo) | ✔️ | ❌ | ❌ | ❌ |
| LR/FR Pan on Pad (Surround) | ✔️ | ❌ | ❌ 1 | ✔️ |
| LR/FR Pan on Joystick (Surround) | ❌ | ❌ | ❌ | ✔️ |
| Master (ST A / 1-2) Assignment | ✔️ | ✔️ | ✔️ | ✔️ |
| LFE (ST B / 3-4) Assignment | ✔️ | ❌ | ✔️ | ✔️ |
| Linked faders 2 | ❌ | ✔️ | ✔️ | ✔️ |
1 : Available with 5.1 Surround function included in Broadcast Package or with DM7 Control Expansion controller.
2 : Linked faders on the CL & QL series are not supported, they will stay connected on the mixer, that information is not shared with Holophonix.
Connection Parameters
You can find the External Link tab in the Settings window. The first step is to establish a connection with your Yamaha console by connecting your console in your remote network and entering the IP address for Mixer Control.
Ensure that your computer and Yamaha console are on the same control network. Refer to your Yamaha console's manual for instructions on setting up network connections.
View your console's IP address in the Mixer Control application or on the console's display (Settings > Network > Mixer Control).

Once connected, the following information will be displayed if successful:

Mixer Type
Displays the connected console type (CL1, CL3, CL5, QL1, QL5, DM3, or DM7).
Visit Yamaha's Digital Mixing Console Overview page for detailed comparisons between models.
Support for Yamaha PM series consoles will be available in a future update.
Mixer State
Shows the current state of the mixer:
- normal
- emergency
- booting
- update
- diagnostics
If the mixer is in any other state than normal, the External Link will not function. Disconnect and reconnect the console to return to normal.
Surround Mode
For consoles with Surround mode, the Surround Mode parameter will be displayed.

The Surround Mode state of the console will determine which parameters are used for position control.
In Surround Mode = "Stereo", use Pan and CSR rotary controls:
- Pan control maps to X position
- CSR control maps to Y position
CSR control is not available on the DM series consoles
In Surround Mode = "Surround", use LR Pan and FR Pan for position control:
- Provides more intuitive control
- Enables joystick control on DM7 Consoles (With DM7 Control Expansion controller)
Surround mode is available on the DM7 only with the "5.1 Surround" function, included in the Broadcast Package or with the DM7 Control Expansion controller.
Channel Link

Auto Link
Automatically creates relationships between existing HOLOPHONIX tracks in the current preset and Yamaha channels. Particularly useful when channels are already set up on the Yamaha console with proper names and colors.
Channels will be linked in the order from the order in the Yamaha mixer to the order that they appear on the mixer panel in HOLOPHONIX.
Sync Parameters
Choose which parameters should be synchronized between systems:
- Label: Track names
- Color: Track colors
- Fader: Level control
- Mute: Mute state
- Position: X/Y positioning
You can use the parameters icons on the top of this panel to quickly enable or disable a parameter for all channels at once.
When linking the parameters, the current state of the Yamaha console and HOLOPHONIX will not be synchronized to ensure safe operation. If you want to synchronize the current state of the synced elements, you can do so by moving the corresponding control on the Yamaha console or HOLOPHONIX panel after linking, or by recalling a saved scene on the Yamaha console.
Special Assignments
- Yamaha's
St 1/2: Dedicated to Master control in HOLOPHONIX - Yamaha's
St 3/4: Dedicated to LFE control in HOLOPHONIX (not available on DM3 consoles)
Your Yamaha console may have the master faders (St A and St B) assigned to different channels than St 1/2 and St 3/4 . You can reassign them in the Yamaha console's settings if needed.
Parameters
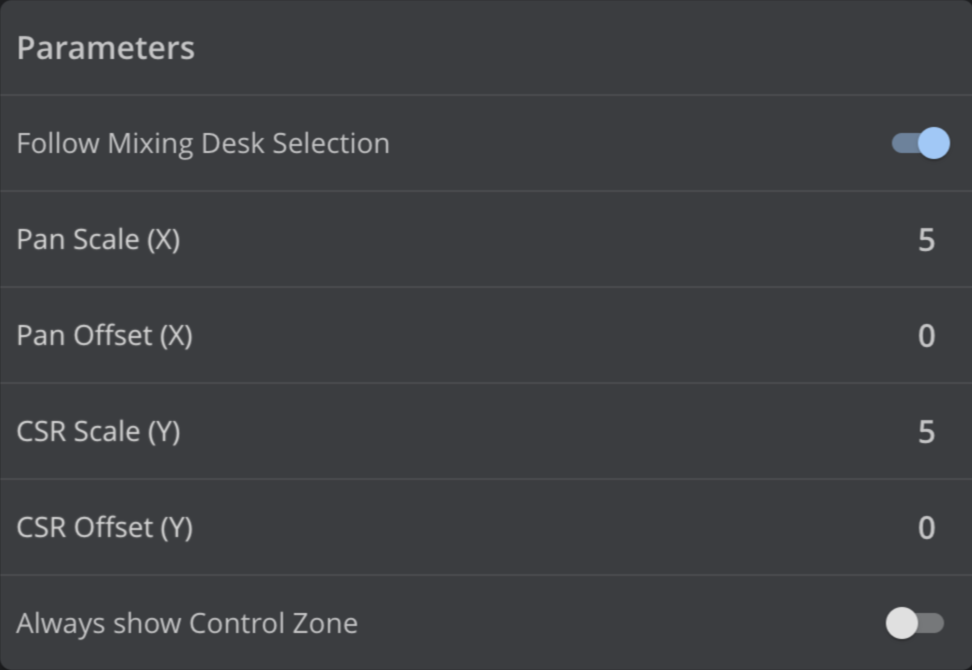
Follow Mixing Desk Selection
Available on CL/QL series only, this feature allows the HOLOPHONIX GUI to follow the channel selection state (SEL button) on the Yamaha console.
Scale and Offset Parameters
Pan Scale
Defines the range of movement for the Pan parameter.
Pan Offset
Sets the center position for the Pan parameter.
CSR Scale
Defines the range of movement for the CSR parameter.
CSR Offset
Sets the center position for the CSR parameter.
LR Pan Scale
Defines the range of movement for the LR Pan parameter.
LR Pan Offset
Sets the center position for the LR Pan parameter.
FR Pan Scale
Defines the range of movement for the FR Pan parameter.
FR Pan Offset
Sets the center position for the FR Pan parameter.
Control Zone

A green rectangle will appear on the Venue when Scale and/or Offset Parameters are changed. By default, it will disappear when the parameter is released. Activating the Control Zone option will keep the control zone visible at all times.

Typical Workflow
-
Set up your channels on the Yamaha console:
- Name your channels
- Assign colors
-
Create the desired number of sources in HOLOPHONIX
-
Use Auto Link to establish initial connections
-
Activate other sync parameters as needed, like Position
-
Move sources from Pan/CSR or Surround Pan controls
-
Save your Yamaha scene
-
Recall your Yamaha scene to ensure complete sync of states with HOLOPHONIX
You can now use the Yamaha workflow to seamlessly control your HOLOPHONIX session.
Using Surround mode for position control is generally recommended, especially with DM7 consoles with DM7 Control extension, as it provides more intuitive control through the joystick.

Troubleshooting
Network Access Permission
If you experience difficulties connecting to your Yamaha console, the issue might be that HOLOPHONIX doesn't have permission to access devices on your local network. This is a common security setting on macOS that needs to be explicitly allowed.
When you first install HOLOPHONIX, you should receive a prompt asking to allow HOLOPHONIX to find and connect to devices on your local network. If you denied this permission or missed the prompt, you can manually enable it:
- Click on the Apple menu and select "System Settings"
- Navigate to "Privacy & Security"
- Scroll down to find "Network" or "Local Network" settings
- Locate HOLOPHONIX in the list of applications
- Enable the toggle to allow HOLOPHONIX to access your local network

After enabling this permission, try reconnecting to your Yamaha console through the External Link interface.